
Advertising in a Cookieless World: 5 Essential Strategies13 min read
June 3, 2024In the digital marketing ecosystem, third-party cookies have long been a staple for online advertisers to track user behavior and tailor their advertising efforts. However, an epic shift is on the horizon: With major browsers phasing out these cookies, marketers are finding themselves in a near cookieless world. This shift heralds a new era where collecting first-party data becomes paramount for crafting effective digital marketing strategies.
Are Third-Party Cookies Going Away?
Unfortunately, the answer is yes. Privacy concerns and increasing demand for more secure and responsible data management practices point to the gradual phase-out of third-party cookies across all major browsers.
Safari was among the first to spearhead this shift with the introduction of Intelligent Tracking Prevention (ITP) in 2017. This privacy feature aimed to limit the use of cookies and other website data to track users across websites, effectively curtailing the ability for third-party entities to gather extensive browsing data.
Following this, Firefox took a decisive step in 2019 by enabling Enhanced Tracking Protection (ETP) by default. This feature blocks known tracking cookies from third-party sources, significantly increasing privacy for its users.
Most notably, Google Chrome, which commands a substantial share of the browser market, announced its intention to phase out third-party cookies by early 2025 through its Privacy Sandbox initiative. Although this timeline has experienced delays, the commitment remains clear.
These concerted efforts across leading browsers illustrate a growing trend towards prioritizing user privacy, compelling marketers to adopt new data collection methods. To help you not only survive, but thrive in this increasingly cookieless digital landscape, we explain five of these techniques below.
#1) Set Up a Means to Collect First-Party Data
As a result of this shift, you as an advertiser must rely more heavily on first-party data: information collected directly from their audiences.
Collecting first-party data means engaging directly with your audience. Strategies include utilizing online contact forms, newsletter sign-ups, customer satisfaction surveys, and account registrations. When implementing data collection methods through one’s website, the appropriate GA4 and GTM settings must be configured to properly collect and use that data.
You can also collect offline data through in-store interactions or events. Data from these external sources can be uploaded to Google Analytics 4 (GA4) and combined with native analytics data to make informed decisions.
#2) Adjust GA4 Settings to Collect Enhanced User Data
Google has introduced enhanced conversion features in GA4 to help advertisers transition into a cookieless future. Using first-party data and machine learning to fill in data gaps, enhanced conversions allow for more accurate conversion measurement. They also enable marketers to track this data across various devices and platforms— all without relying on third-party cookies.
To leverage Google Analytics 4 (GA4) for enhanced user data collection, there are several key settings and configurations that need to be adjusted:
Switch Data Retention to 14 Months
By default, GA4’s data retention setting is configured to retain user data for a period of two months. Extending the data retention period to 14 months provides a more comprehensive view of user behavior over a longer timeline.
How to Implement:
In the lower-left corner of the interface, click on the “Admin” gear icon to access the admin settings. Under “Data collection and modification,” find and click “Data retention.” You will see a drop-down menu under “Event data” labeled “Data retention.” Navigate to this menu and select “14 months.” Then click “Save.”
Enable User-Provided Data Collection
Enabling enhanced measurement in GA4 is crucial for capturing a more detailed and actionable understanding of user interactions on your site. Enhanced measurement automatically tracks significant events such as page views, scrolls, outbound clicks, site searches, video engagements, and file downloads without the need for additional code implementation. Ultimately, you are left with a more comprehensive dataset for analysis.
How to Implement:
Navigate to the “Admin” settings. Under “Data collection and modification,” click on “Data streams.” Then, under the “Enhanced measurement” section, toggle on the events that you wish to track automatically.
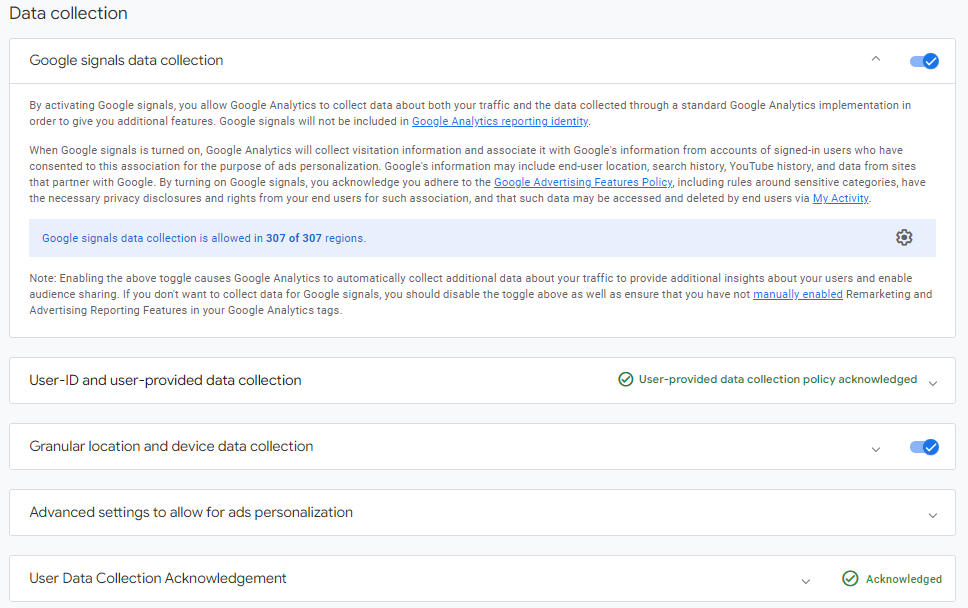
Enable Google Signals
Google Signals allows for the collection of first-party data from users who have turned on ads personalization in their Google accounts. This setting is especially useful as it provides insights into user behavior across platforms and devices, even if they are not logged into your website or app. Enabling Google Signals can enhance audience understanding and targeting capabilities, providing valuable insights for tailored marketing campaigns.
How to Implement:
Navigate to the “Admin” settings. Under “Data collection and modification,” select “Data Collection.” Then, click “Turn On” under “Google signals data collection.”
Configure User IDs for More Accurate Analytics
Enabling User IDs is crucial for obtaining a more accurate and holistic view of user interactions across different devices and sessions. This feature allows you to track individual users rather than devices, enabling the linkage of multiple sessions and interactions to a single user.
How to Implement:
There are several methods for configuring user IDs, described here.
Check Remaining Data Collection Settings and Accept Terms
While you’re in the “Data collection” section, ensure that “Granular location and device data collection” and “Advanced settings to allow for ads personalization” are set to 307 of 307 regions. (They should be, by default.) Before navigating away from this page, don’t forget to accept the user data collection acknowledgement by clicking on “I acknowledge” at the bottom.
#3) Set up Google Ads Enhanced Conversions
To ensure accurate measurement and to optimize the performance of your ad campaigns, it’s essential to configure enhanced conversions for Google Ads. Enhanced conversions enhance the reliability of conversion tracking by supplementing existing conversion tags with hashed first-party customer data from websites.
This encrypted first-party data can include information like name, email address, phone number, and address and is sent to Google Ads when the user completes an action on your website. It can also be uploaded directly to Google Ads.
To set up enhanced user data collection in Google Ads, start by doing the following:
- Link Your Google Ads Account: In the Admin section, go to “Google Ads links” under “Product links.” Link your Google Ads account to your GA4 property.
- Configure Data Settings: Under “Data collection and modification,” select “Data collection” and click “Turn On” under “User-provided data collection.”
How to Configure Automatic Conversions
Google Tag Manager (GTM) enables you to efficiently manage tags and code snippets on your website without modifying the code. Here are the steps to configure this setup:
In Google Ads:
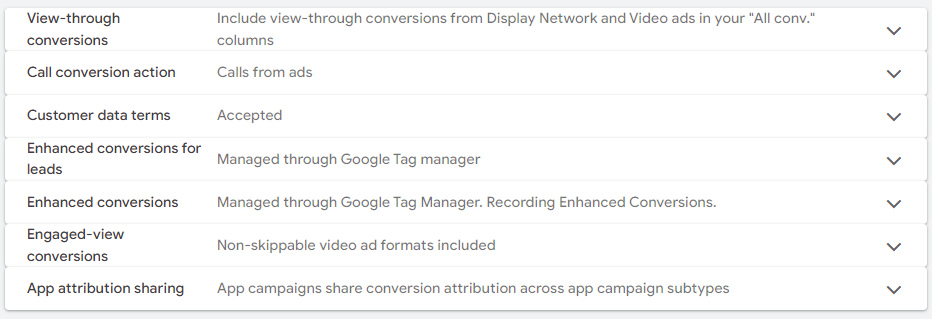
- Review and accept the Google Ads enhanced conversions terms and conditions. These can be found under Tools and settings > Conversions > Settings > Customer data terms.
- In the same section, check the box and turn on “Enhanced conversions for leads.” Select Google Tag Manager in the dropdown and click “Save.” (This is the preferred method.)
- Do the same for “Enhanced conversions.”
- Then view your conversions and edit the conversion action for which you are setting up enhanced data collection. At the bottom, you should see a message stating “Enhanced conversions are being recorded.“
- Proceed to the GTM setup described below. Note that after accepting the terms in step 1, you typically have to wait five days for this setup to take effect.
In Google Tag Manager:
- Open the Tags tab and select the Google Ads conversion tracking tag for which you want to implement enhanced conversions.
- Make sure the Conversion ID and Conversion Label for the tag and for the Google Ads conversion tracking match.
- Check the box next to “Include user-provided data from your website” and select “New Variable…” from the drop-down list.
- Give your variable a name and select “Automatic collection.” Save the variable, then save the tag.
These steps for automatic data collection must be repeated for each conversion action for which you want to set up enhanced conversions.
Note: Enhanced user-provided data will be collected only for events where an email and/or phone number is collected. Google Ads now also supports enhanced user data via conversion events imported from GA4.
Other Methods of Collecting Enhanced User Data in Google Ads
The automatic collection method in Google Tag Manager (GTM) is undoubtedly the quickest and simplest approach to implement enhanced conversions. However, there are other options available for implementing enhanced conversions:
- Manual Tag Configuration:
You can also manually configure tags. This involves creating and managing different GTM and JavaScript variables (or CSS properties) to capture and send user data. While this method provides more control and customization capabilities, it more complex.
- Code Configuration:
Finally, the code configuration method involves adding a code snippet to your website that sends hashed customer data for matching. Although this is the best method of ensuring the accuracy of enhanced conversions, it is also the most involved and usually requires the help of a developer.
#4) Implement Consent Mode
What is Consent Mode?
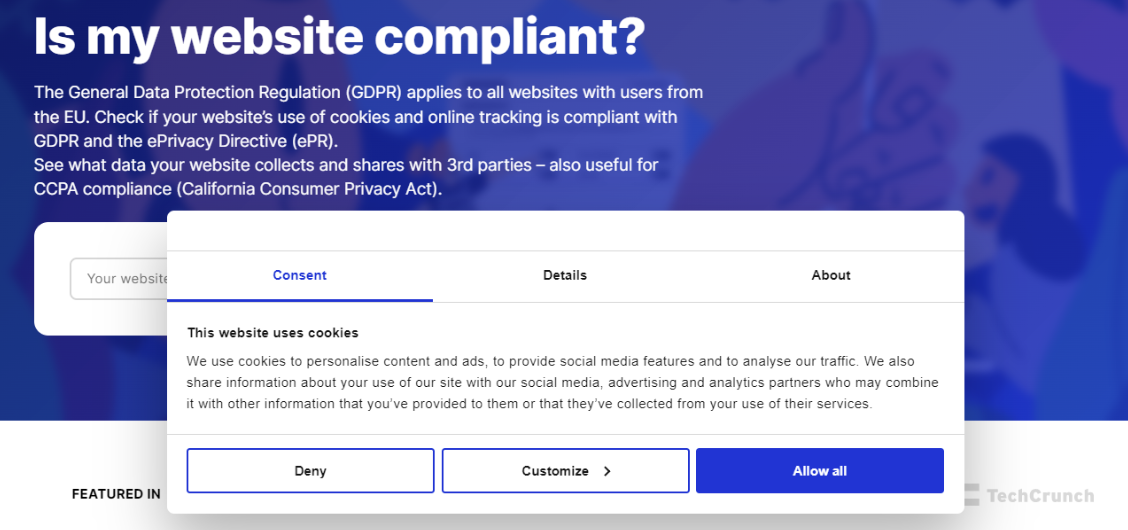
Consent Mode is a feature in Google Analytics that allows you to adjust how data collection occurs based on user consent. It enables you to control which Google tags (i.e., various tracking codes, such as Google Ads) trigger based on the user’s consent status for cookies and advertising personalization purposes. This ensures compliance with privacy regulations like GDPR.
Consent Mode and GDPR
One of the key stipulations of GDPR is that organizations must obtain consent from users before collecting any personal data from users in the European Union (EU). This legal framework prioritizes user privacy and provides individuals with greater control over their data.
Consent Mode directly addresses the requirements of GDPR by allowing advertisers to adjust the behavior of their Google tags based on the consent status of their users. By leveraging this feature, businesses can continue to gather valuable insights and optimize their advertising efforts without violating user privacy or facing legal repercussions.
Cookiebot: The CMP Partner of Choice
Cookiebot offers a robust Consent Management Platform (CMP) for managing user consent and ensuring compliance with GDPR and other privacy regulations like CCPA and LGPD. Its integration with Google Consent Mode allows for sophisticated yet easy-to-implement data collection adjustments based on that consent.
Many advertisers and agencies prefer Cookiebot because it is one of the lower costing consent mode applications. Other key benefits of this platform include regular website scans and integration with many popular platforms like WordPress and Squarespace.
How to Implement Google’s Consent Mode Using Cookiebot
Implementing consent mode with Cookiebot involves a few steps:
- Create a Cookiebot Account: Visit the Cookiebot website and sign up for an account. Follow the on-screen prompts to complete the registration process.
- Set Up Your Domain: After logging into your Cookiebot account, add your domain(s) you wish to manage. Cookiebot will scan your website to identify cookies and trackers.
- Customize Consent Banner: Customize the consent banner to match your website’s design and user interface. Cookiebot offers various customization options, allowing you to tailor the banner’s appearance and behavior to ensure a seamless user experience.
- Implement Cookiebot Script: Generate the Cookiebot script from your account dashboard. Insert this script into the header of your website’s HTML code. This script is crucial for enabling Cookiebot to manage consents based on user preferences.
To simplify the process, you can use a plugin like this one for WordPress. GTM configuration is outlined here.
- Sync with Google Consent Mode: In the Cookiebot dashboard, navigate to the settings and enable Google Consent Mode. This will allow Cookiebot to automatically adjust your Google tags based on the user’s consent status, adhering to GDPR and other privacy regulations.
- Verify Implementation: After setting up and enabling the necessary configurations, conduct thorough testing to ensure that the consent banner appears correctly and that user preferences are respected. Use tools like Chrome DevTools to verify that cookies and trackers behave based on user consent.
- Monitor and Optimize: Cookiebot provides monthly scan reports that can help you to optimize your consent management strategies and improve user experience.
#5) Implement Facebook Conversions API
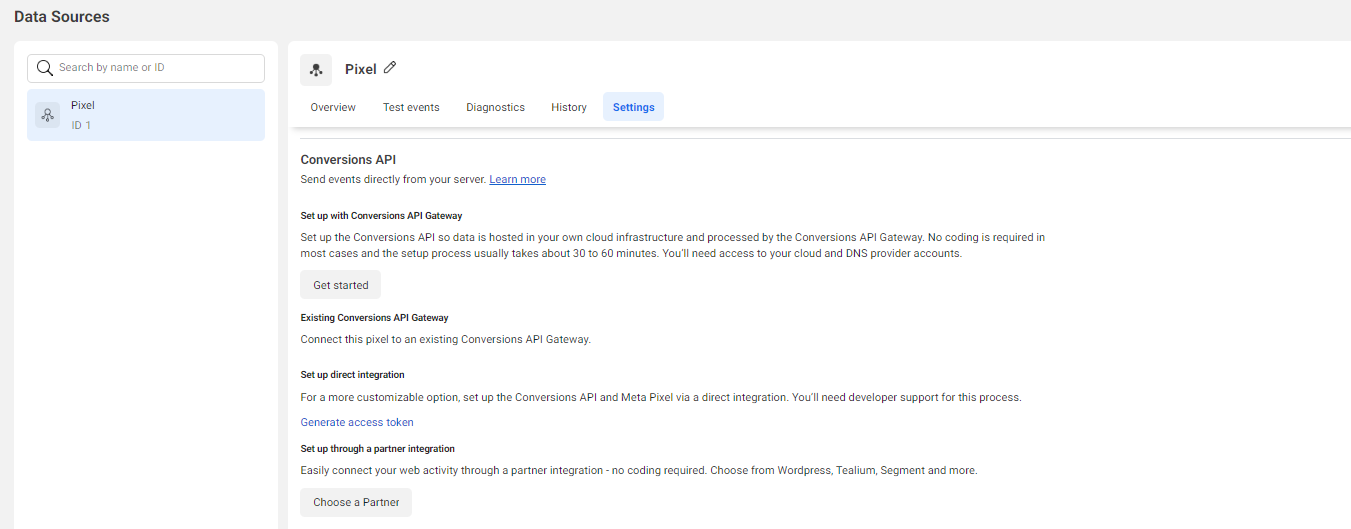
Facebook’s Conversions API (CAPI) is Meta’s solution for cookieless tracking. This is essentially a tool that allows you to send conversion data from their websites directly to Facebook’s servers. This API works alongside the standard Facebook pixel to maximize ad performance.
Since the Conversions API uses server-side tracking, you can accurately track conversions even if users delete their browser cookies, use ad blockers, or switch devices. Ultimately, this allows you to collect more audience data, improve targeting, and increase your reported conversions.
How to Set Up Conversions API
To implement Facebook Conversions API, you will need some technical knowledge as well as access to your website’s backend. Here are the basic steps involved:
- Set Up Facebook Business Manager: If you haven’t already, create a Facebook Business Manager account and connect it to your business’s Facebook page.
- Set Up Your Facebook Pixel: If you don’t have a Facebook pixel yet, create one and add it to your website. If you already have a pixel set up, ensure that it is working correctly.
- Access Your Pixel Settings: In your Facebook Business Manager account, navigate to the Events Manager and select your pixel. Then go to “Settings,” scroll down to “Conversions API,” and click “Get started.“
- Choose a gateway hosting option: Either click “Partner with Stape” or “Host yourself.” Hosting the API yourself requires more technical knowledge.
- Install CAPI Code on Your Website: Depending on your chosen hosting option, you will need to follow the instructions displayed and then insert the Stape or Facebook CAPI code into your website’s header. This code connects your server with Facebook’s API.
Note that Facebook has free API partner integrations with WordPress, Shopify, Wix, and other platforms. Integration with non-supported platforms typically requires a $10/month fee for each pixel.
Consider using a plugin for easy, seamless integration. For example, PixelYourSite is a free WordPress plugin that integrates with Facebook Conversions API. To set this up, you will need to install the plugin, connect it with your Facebook Business Manager account, and follow the prompts. This includes configuring app settings like enabling advanced matching and generating an access token.
- Test and Verify Implementation: After setting up CAPI, conduct thorough testing to ensure that event data is being sent accurately to Facebook. Use tools like the Meta Pixel Helper or Chrome DevTools to verify that events are being tracked and attributed correctly.
We’ve Got Your Back!
The move towards a cookieless world presents both challenges and opportunities for marketers. At Sharp Innovations, we’re here to help you adapt and evolve with the digital landscape’s changing privacy norms. In fact, we’re ahead of the curve.
Don’t waste another minute losing valuable data and sacrificing revenue in the process. Contact us for a free consultation and see how we can help you to leverage your Paid Search and SEO efforts in a way that’s compliant and designed to maximize your ROI.

Anita Taide leads the Paid Search department at Sharp Innovations. With over 20 years of experience in digital marketing and a focus on PPC, Anita uses her industry knowledge as well as her creative and analytical skills to create strategies that drive results. She is Google Ads-certified and holds degrees in multiple disciplines, including Marketing, Writing, and Computer Information Systems.