-
Outlook Setup
This was done using Outlook 2007. Your Outlook may appear differently or may require extra steps to perform.
*Click the version to reveal instructions.
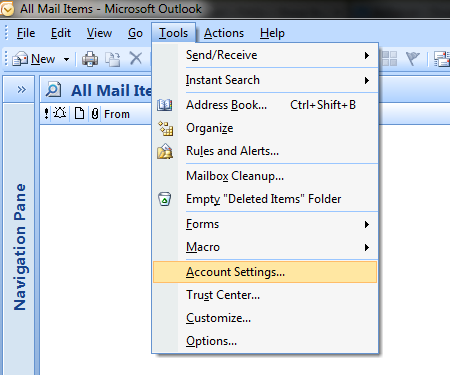
To add an account, begin by going to Tools → Account Settings.
Alternatively, you can go to Tools → Options, then clicking on the Mail Setup tab then clicking the E-mail Accounts... button.
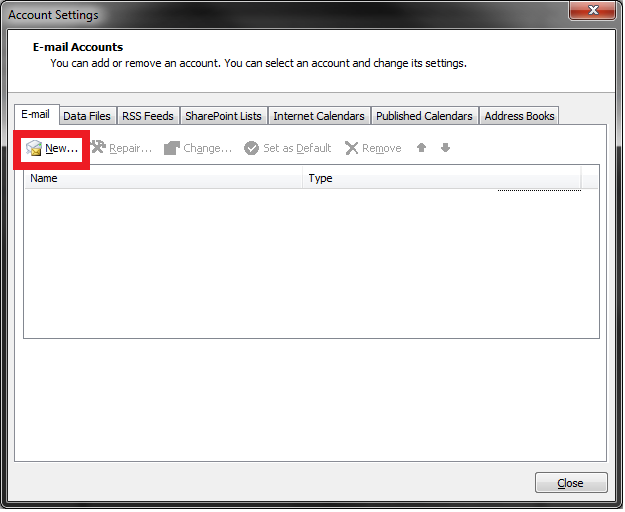
Under the E-mail tab, click the New.. button.
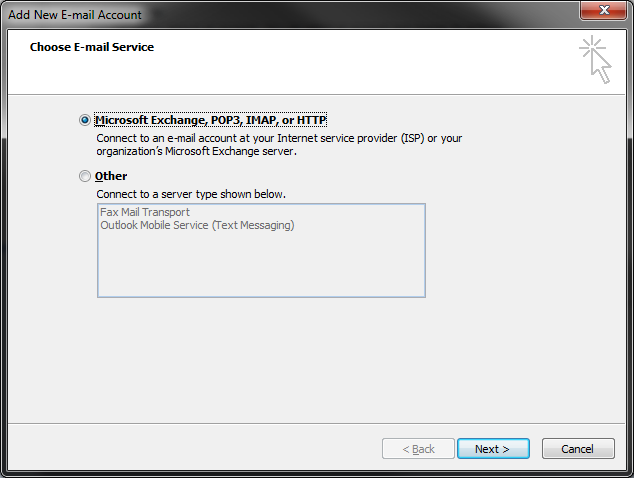
On the Choose E-mail Service, choose Microsoft Exchange, IMAP, or HTTP then click the Next button to proceed.
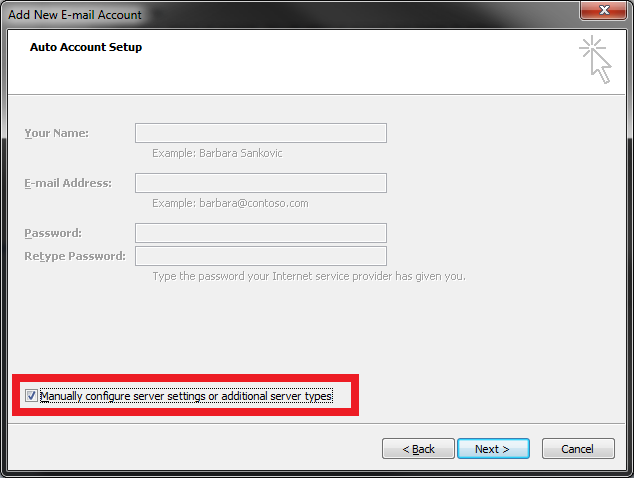
On the Auto Account Setup step, check the box labeled Manually configure server settings or additional server types. Click Next.
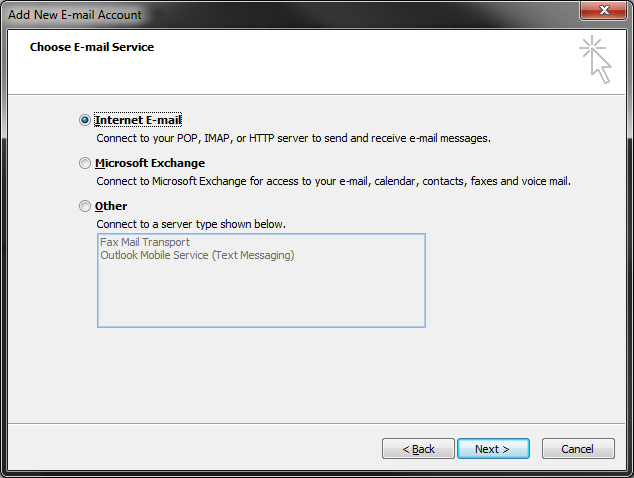
On the Choose E-mail Service step, check Internet E-mail, then click Next.
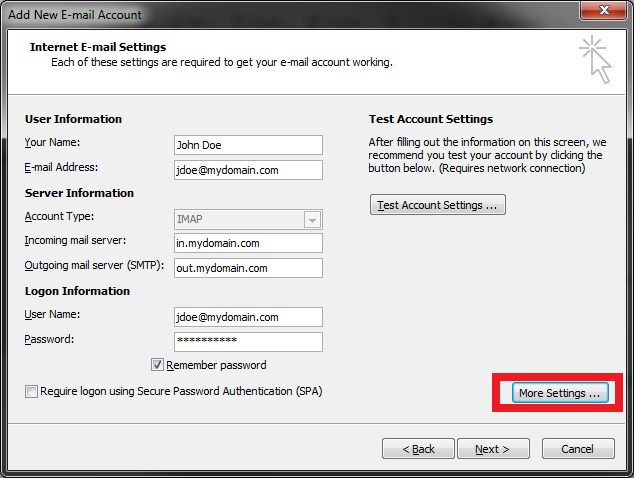
Now you can fill in the fields for the Internet E-mail Settings step, fill in the following sections accordingly:
- User information
- Your Name — Your name as you want it to appear to those receiving your e-mails.
- E-Mail Address — The email address that was created for you.
- Server Information
- Account Type — Choose IMAP if you'd like to be able to synchronize your email to other devices or computers. Otherwise, choose POP3.
- Incoming Mail Server — You will need to set this to in.mydomain.com where mydomain.com is your registered domain.
- Outgoing Mail Server (SMTP) — You will need to set this to out.mydomain.com where mydomain.com is your registered domain.
- Login Information
- User name — This will be your full email address that you completed in the User information section.
- Password — Your assigned email password that was given to you.
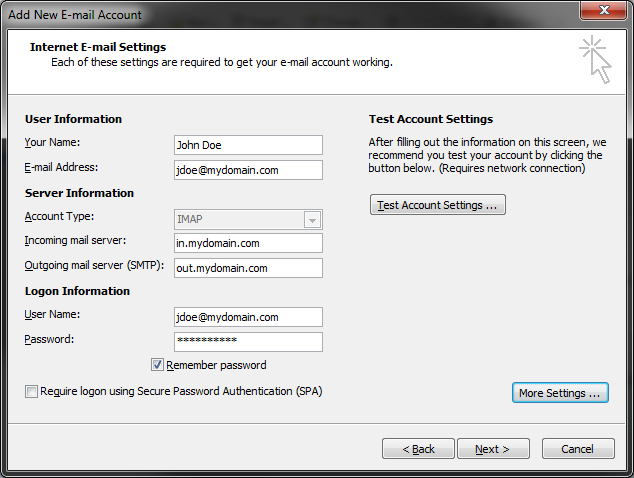
Click More Settings when done.
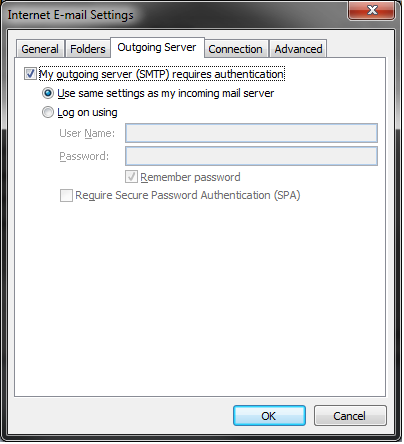
After clicking More Settings, click the tab labeled Outgoing Server.
Check the box labeled "My outgoing server (SMTP) requires authentication". Make sure the selection below is set to "Use same settings as my incoming mail server" then click "OK".
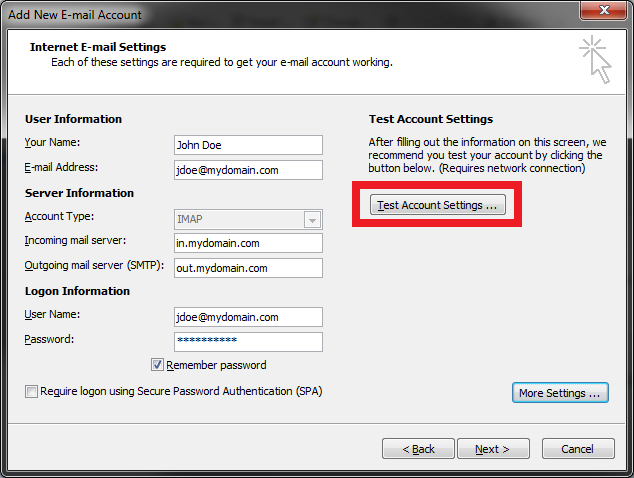
After following the steps above, you can click Test Account Settings ... first to make sure your information is correct and that there are no issues with connectivity.
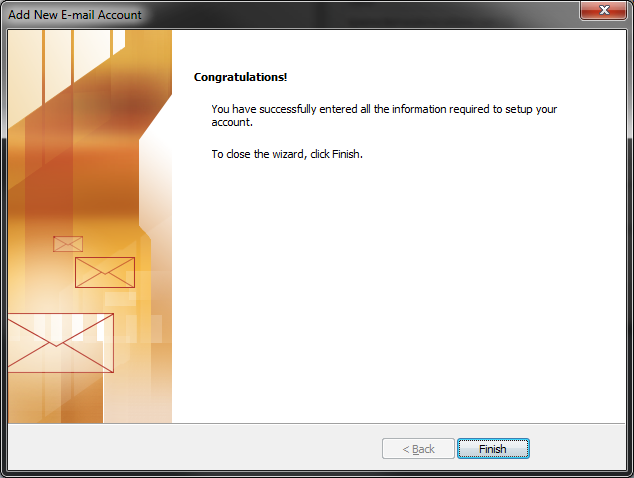
If Outlook did not encounter an error, click Next to finish!
-
Android Setup
*Some screenshots may differ depending upon device model. Settings remain the same.
*Click the version to reveal instructions.
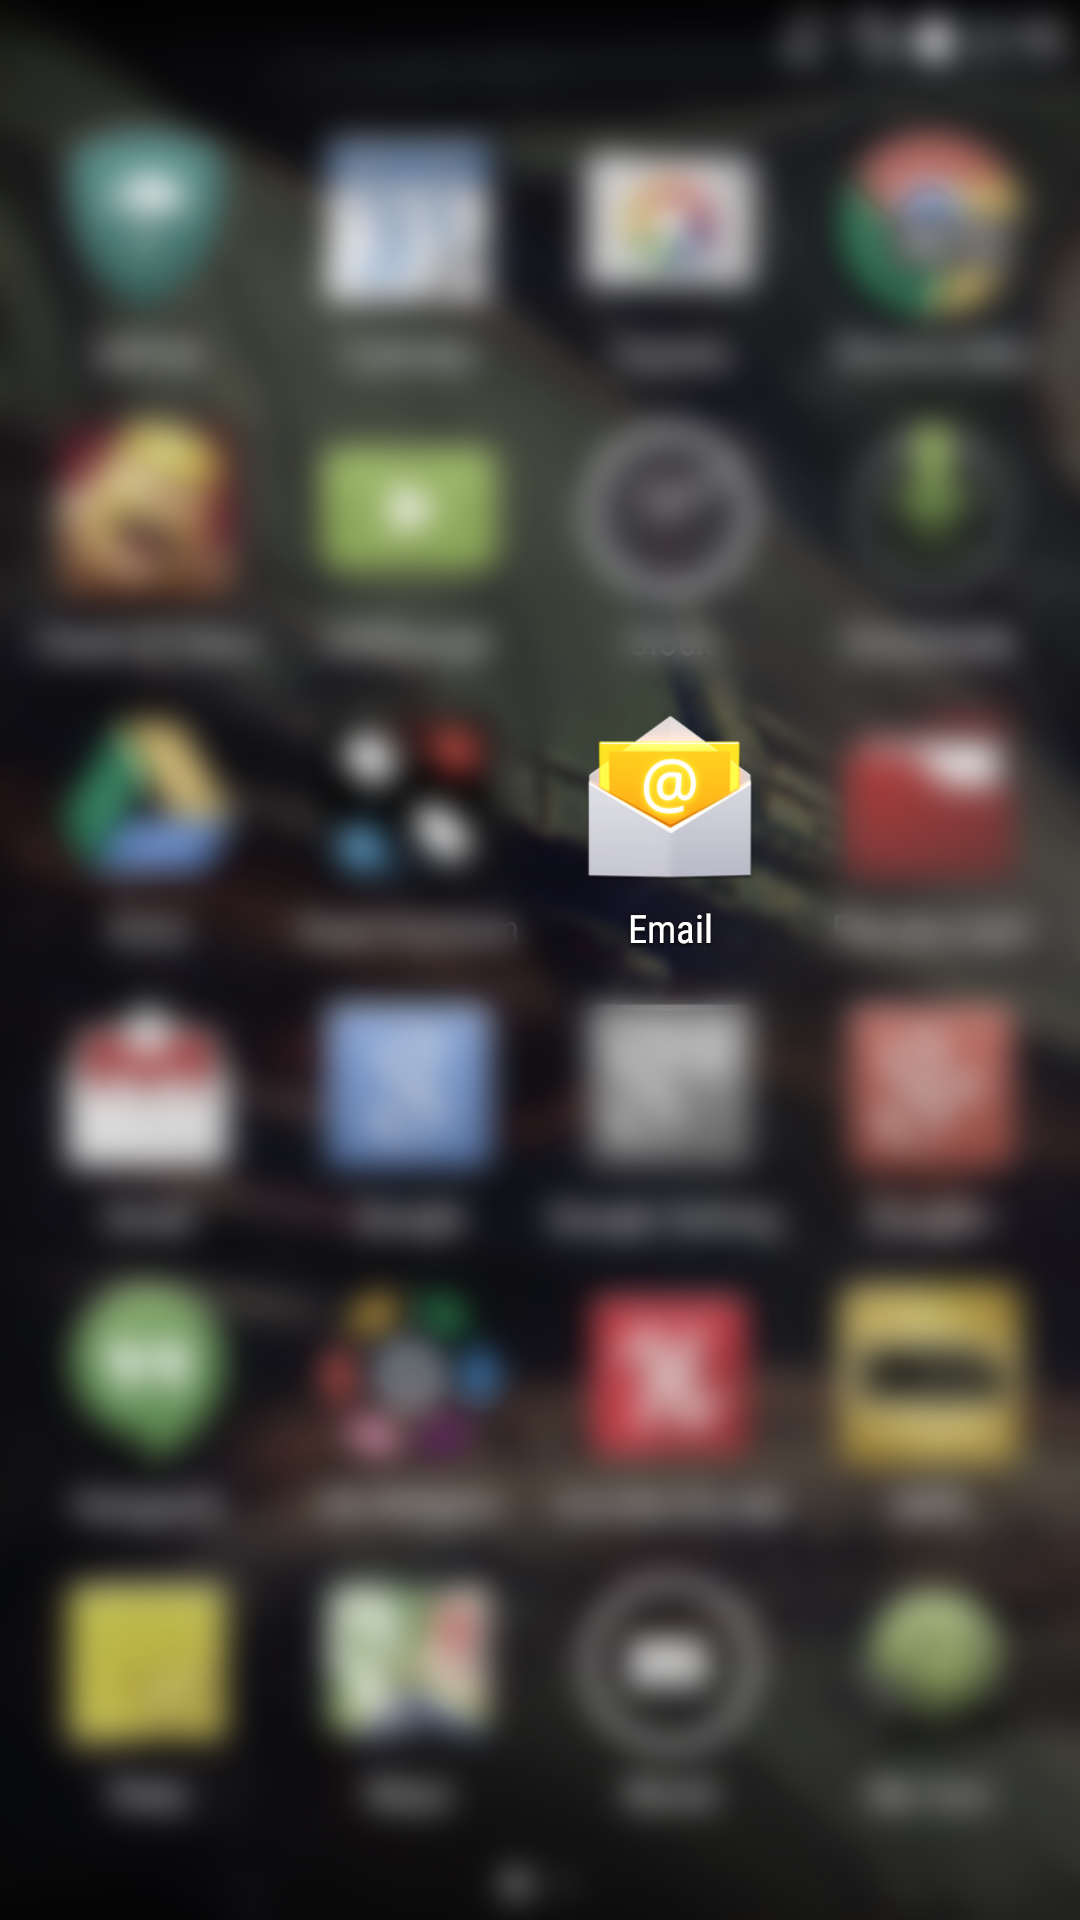
Open the Email app from the App Drawer.
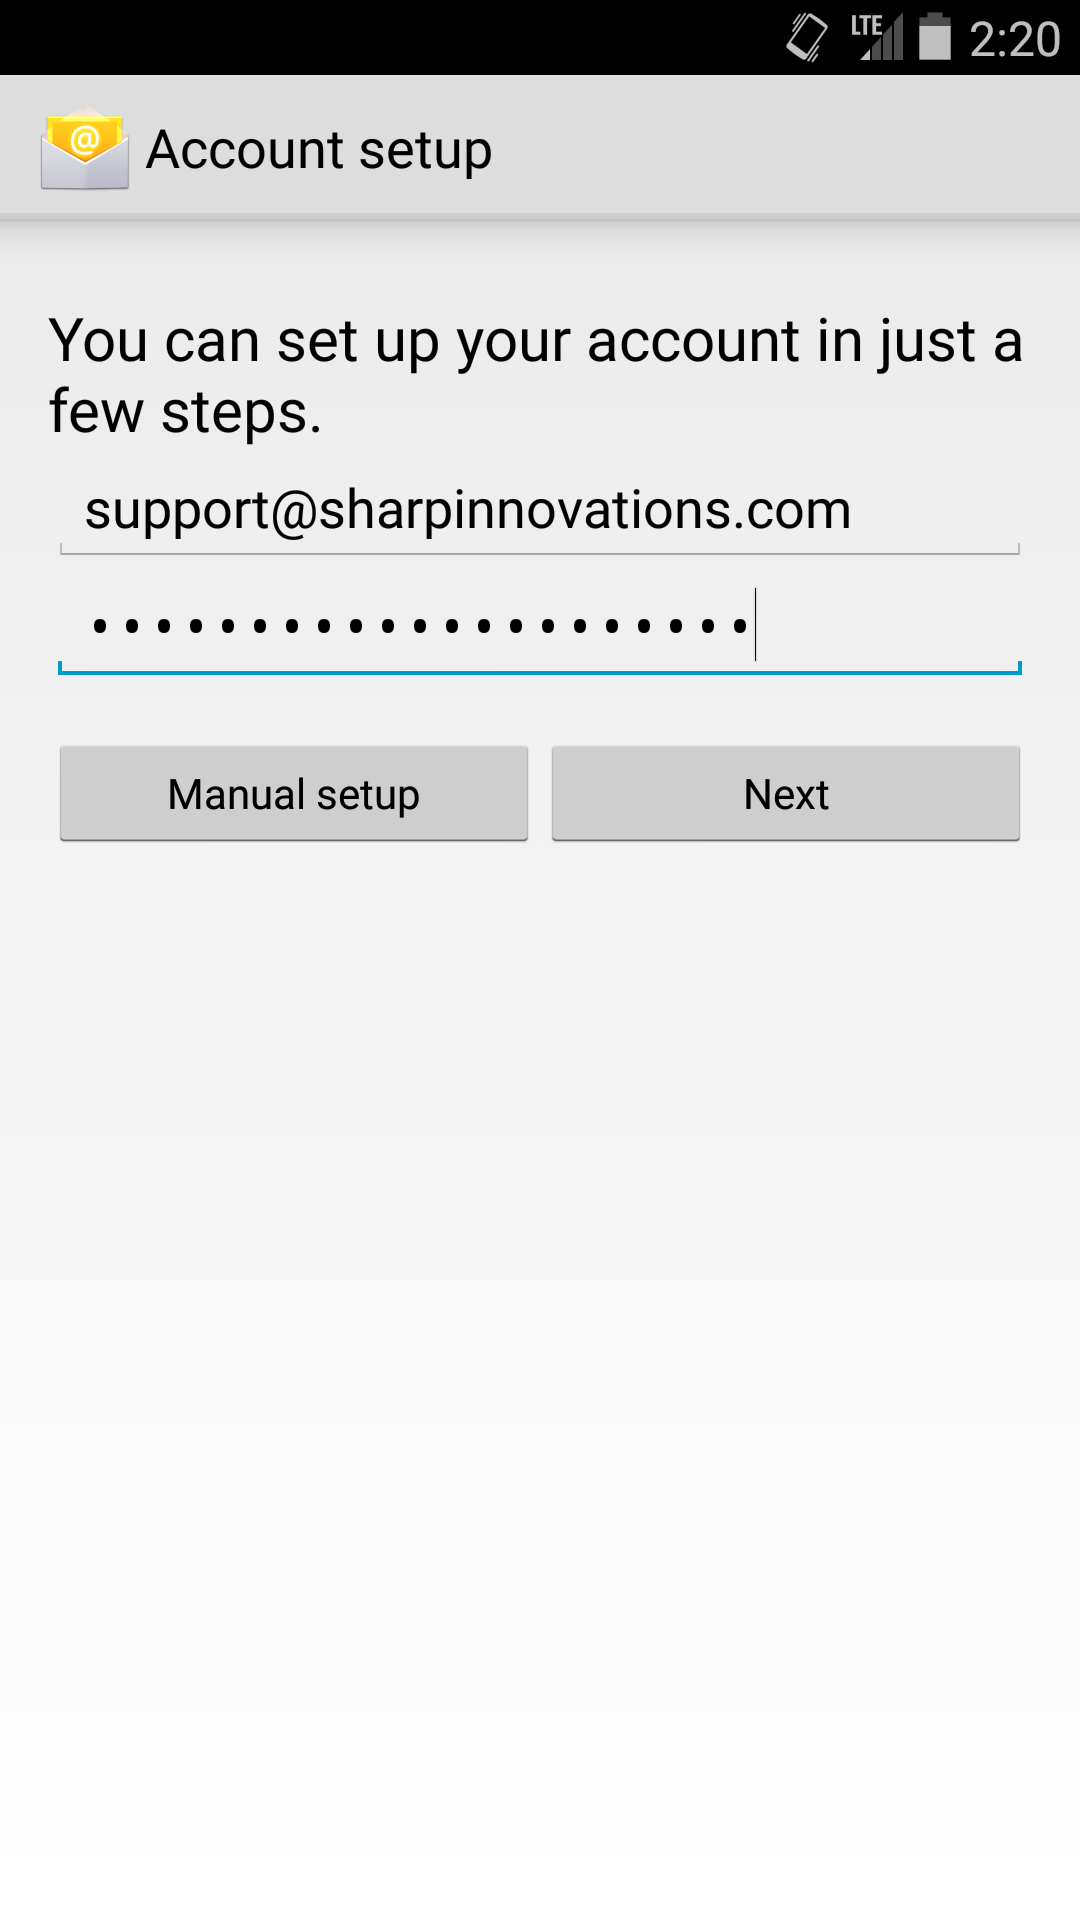
Enter in full email address and corresponding email password. Select Manual setup after.
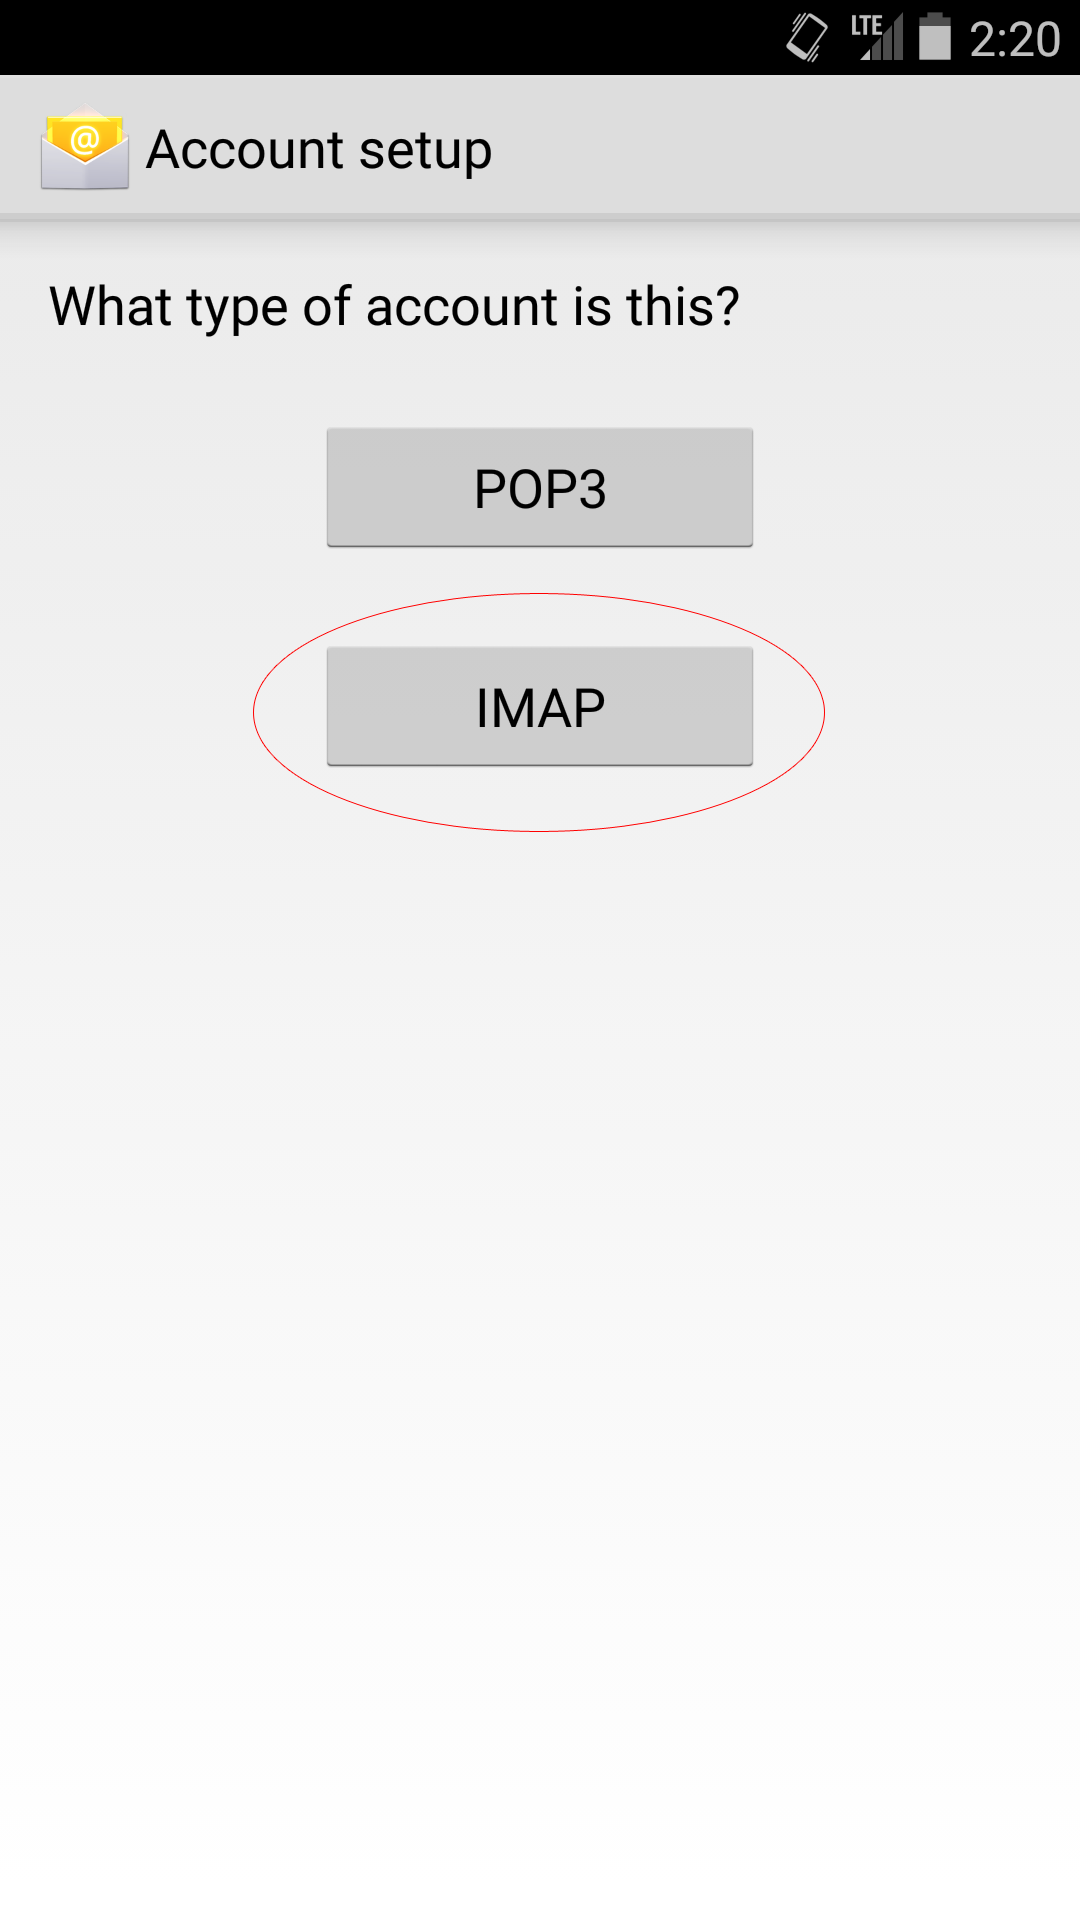
In most cases, IMAP will be the preferred account type. For an explanation of IMAP vs POP3, please visit our blog post. If unsure, select IMAP.
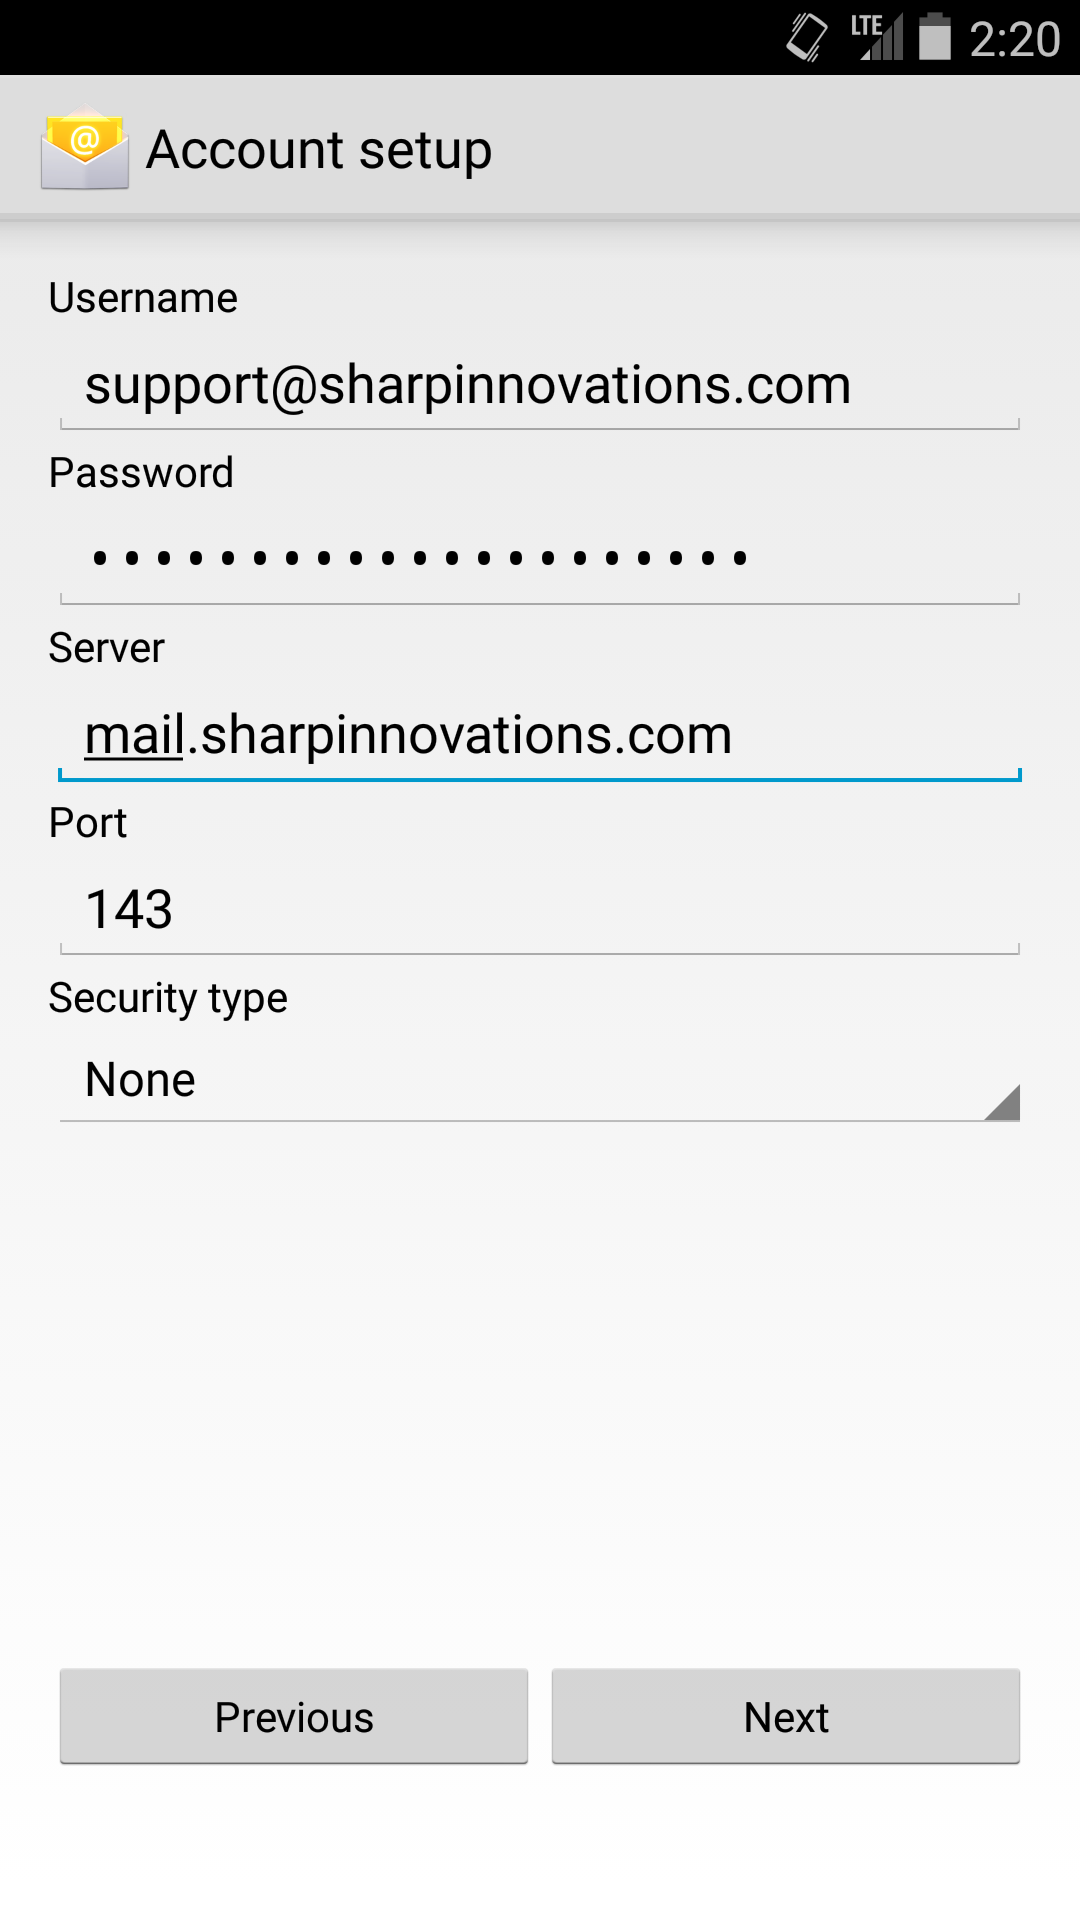
Change the server from imap.domain-name.com to mail.domain-name.com, where 'domain-name' is your website address. Make sure the username is your full email address and your password is entered. Other settings can be left at their default.
Once the 'Validating server settings...' from the previous step finishes, change the SMTP server again from imap.domain-name.com to mail.domain-name.com. Ensure Require signin is checked and your username and password are filled out as before. Tap 'Next'.
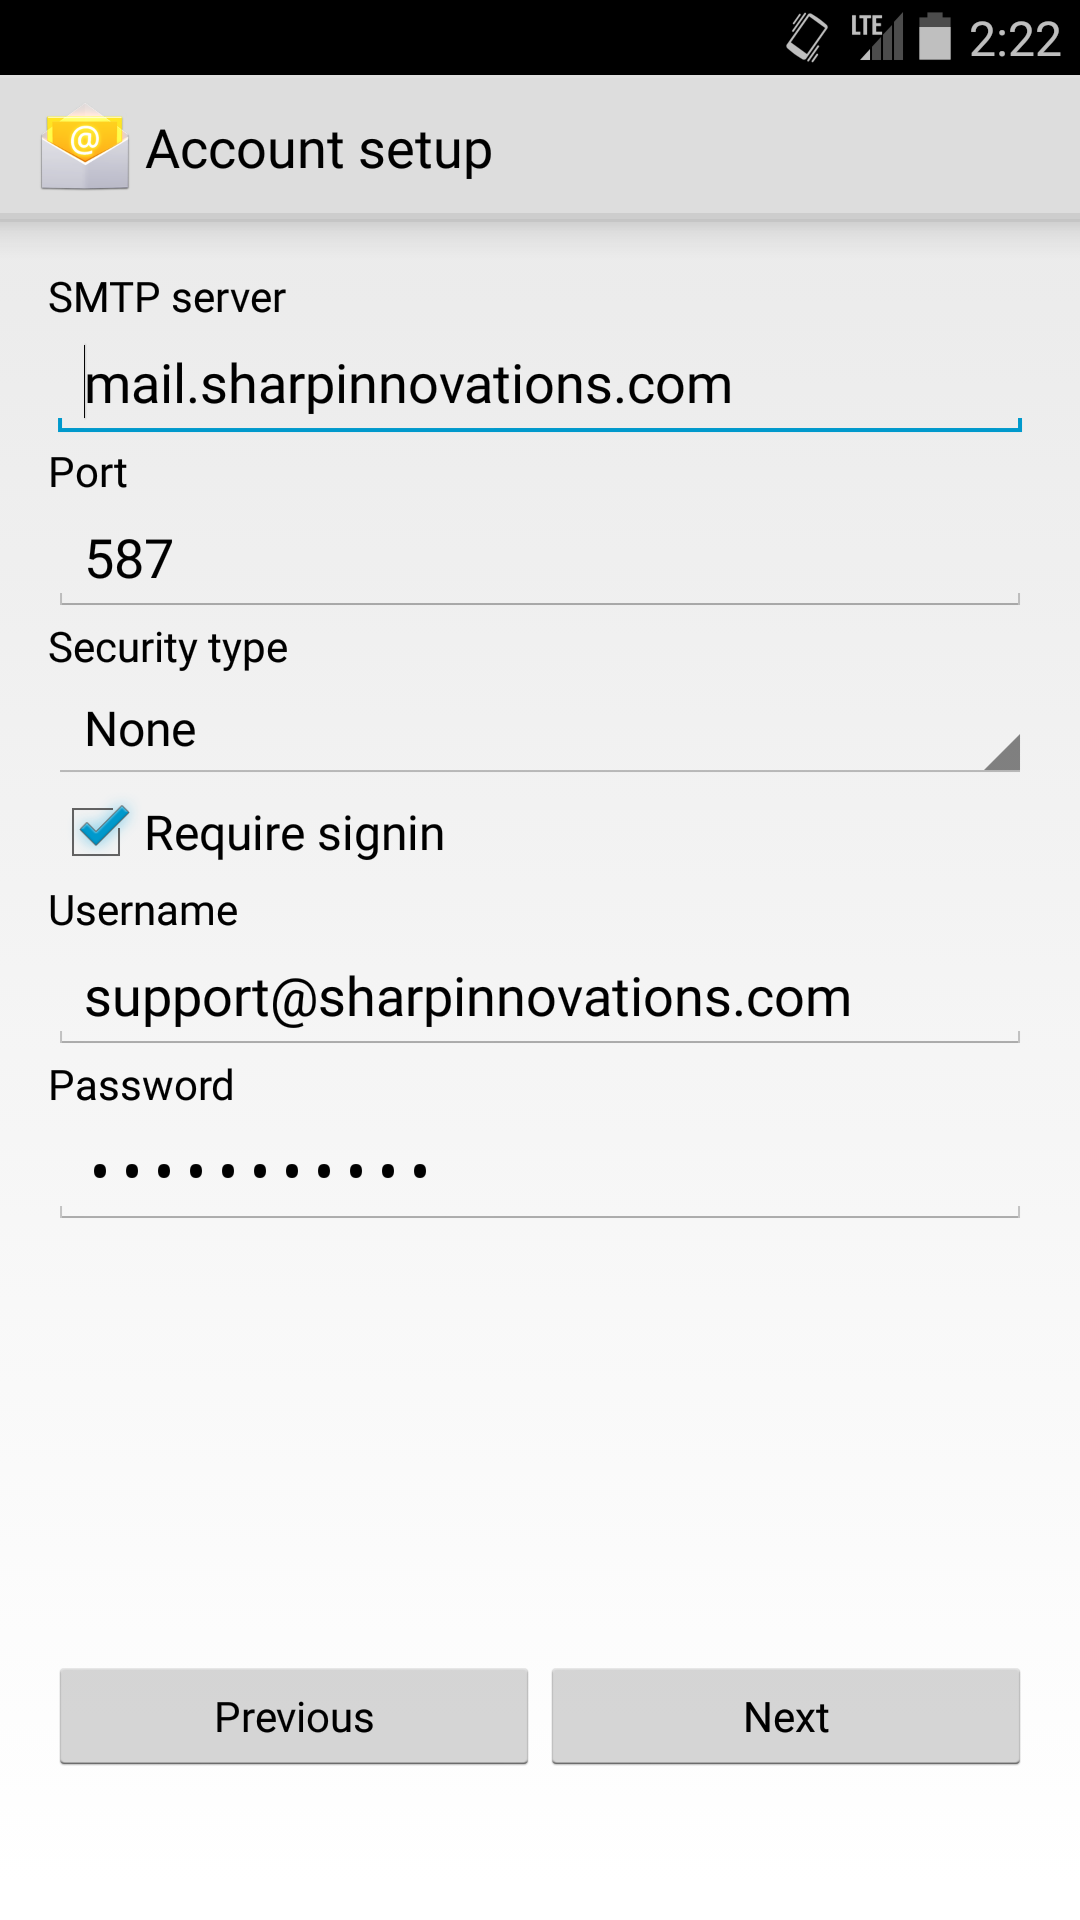
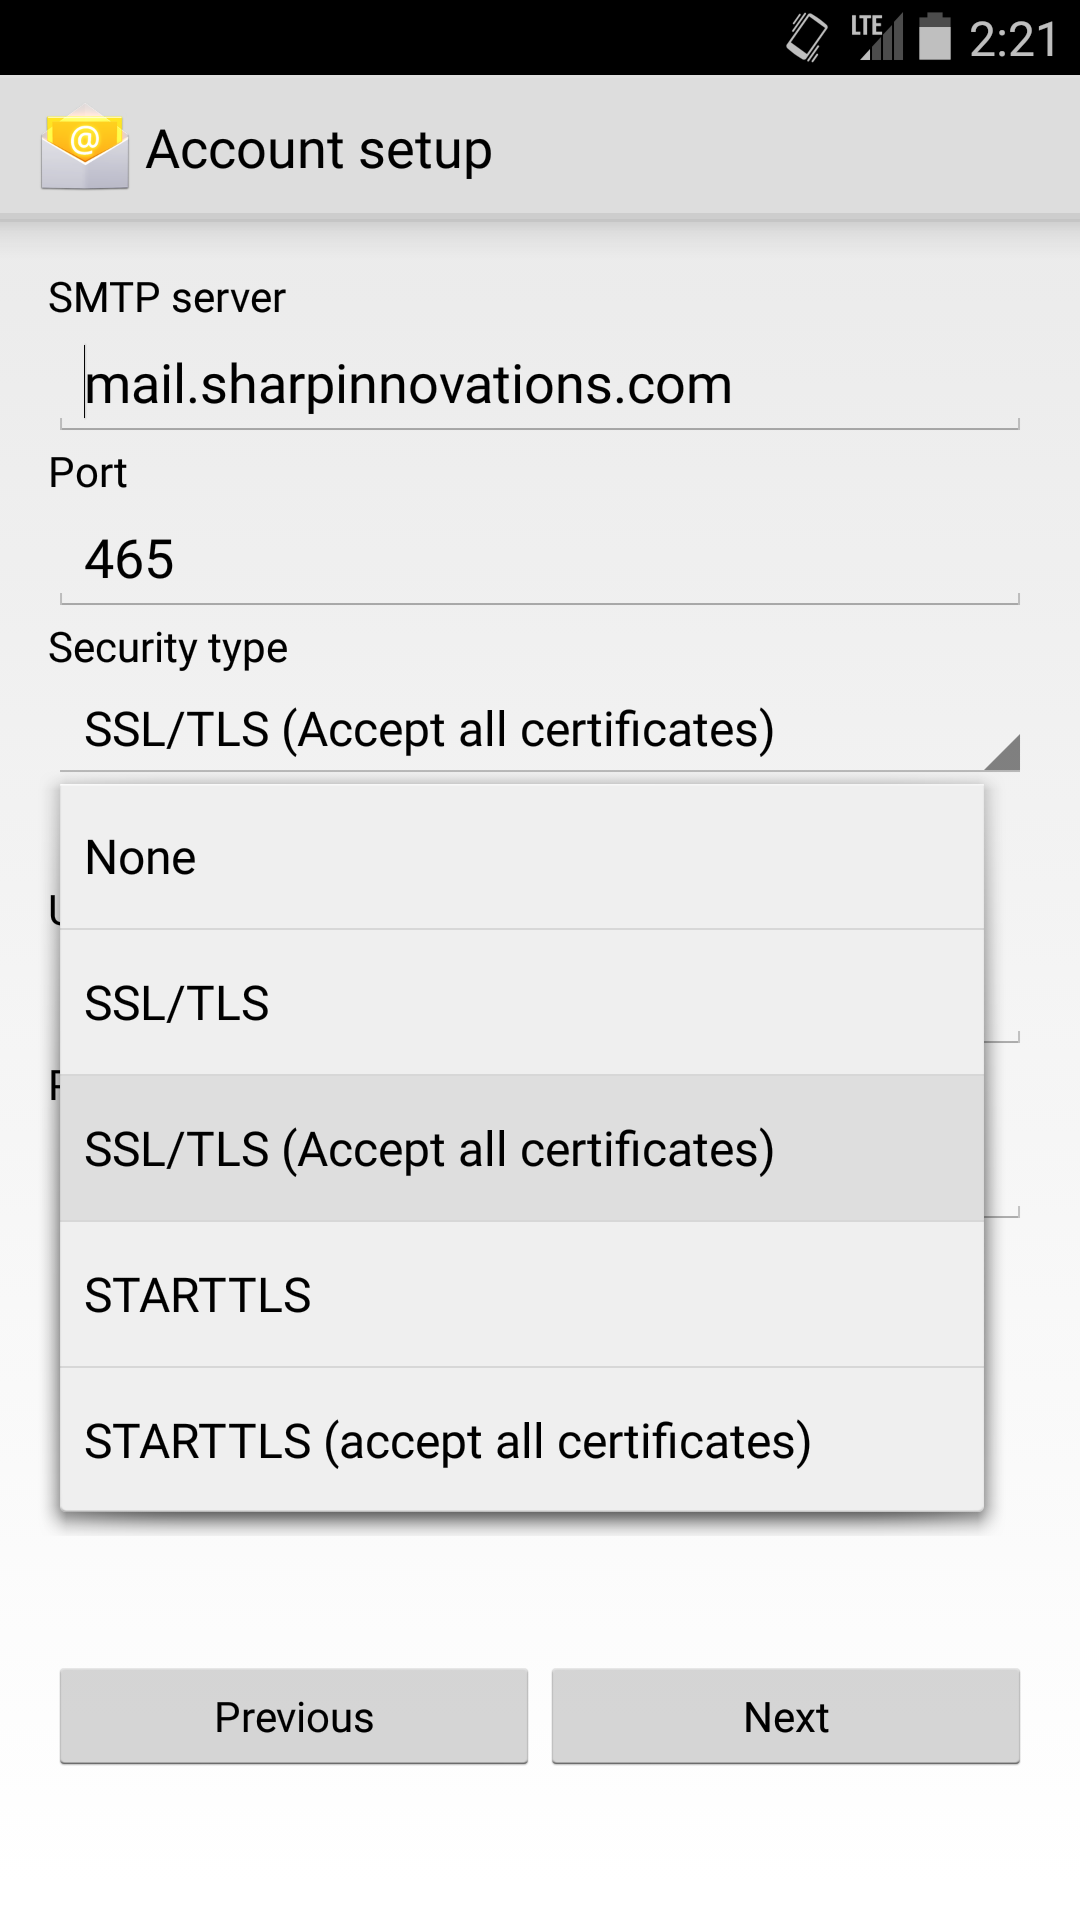
If you receive an error at this point change the Security type to SSL/TLS (Accept all certificates). Usually this is necessary only on Samsung Android devices.
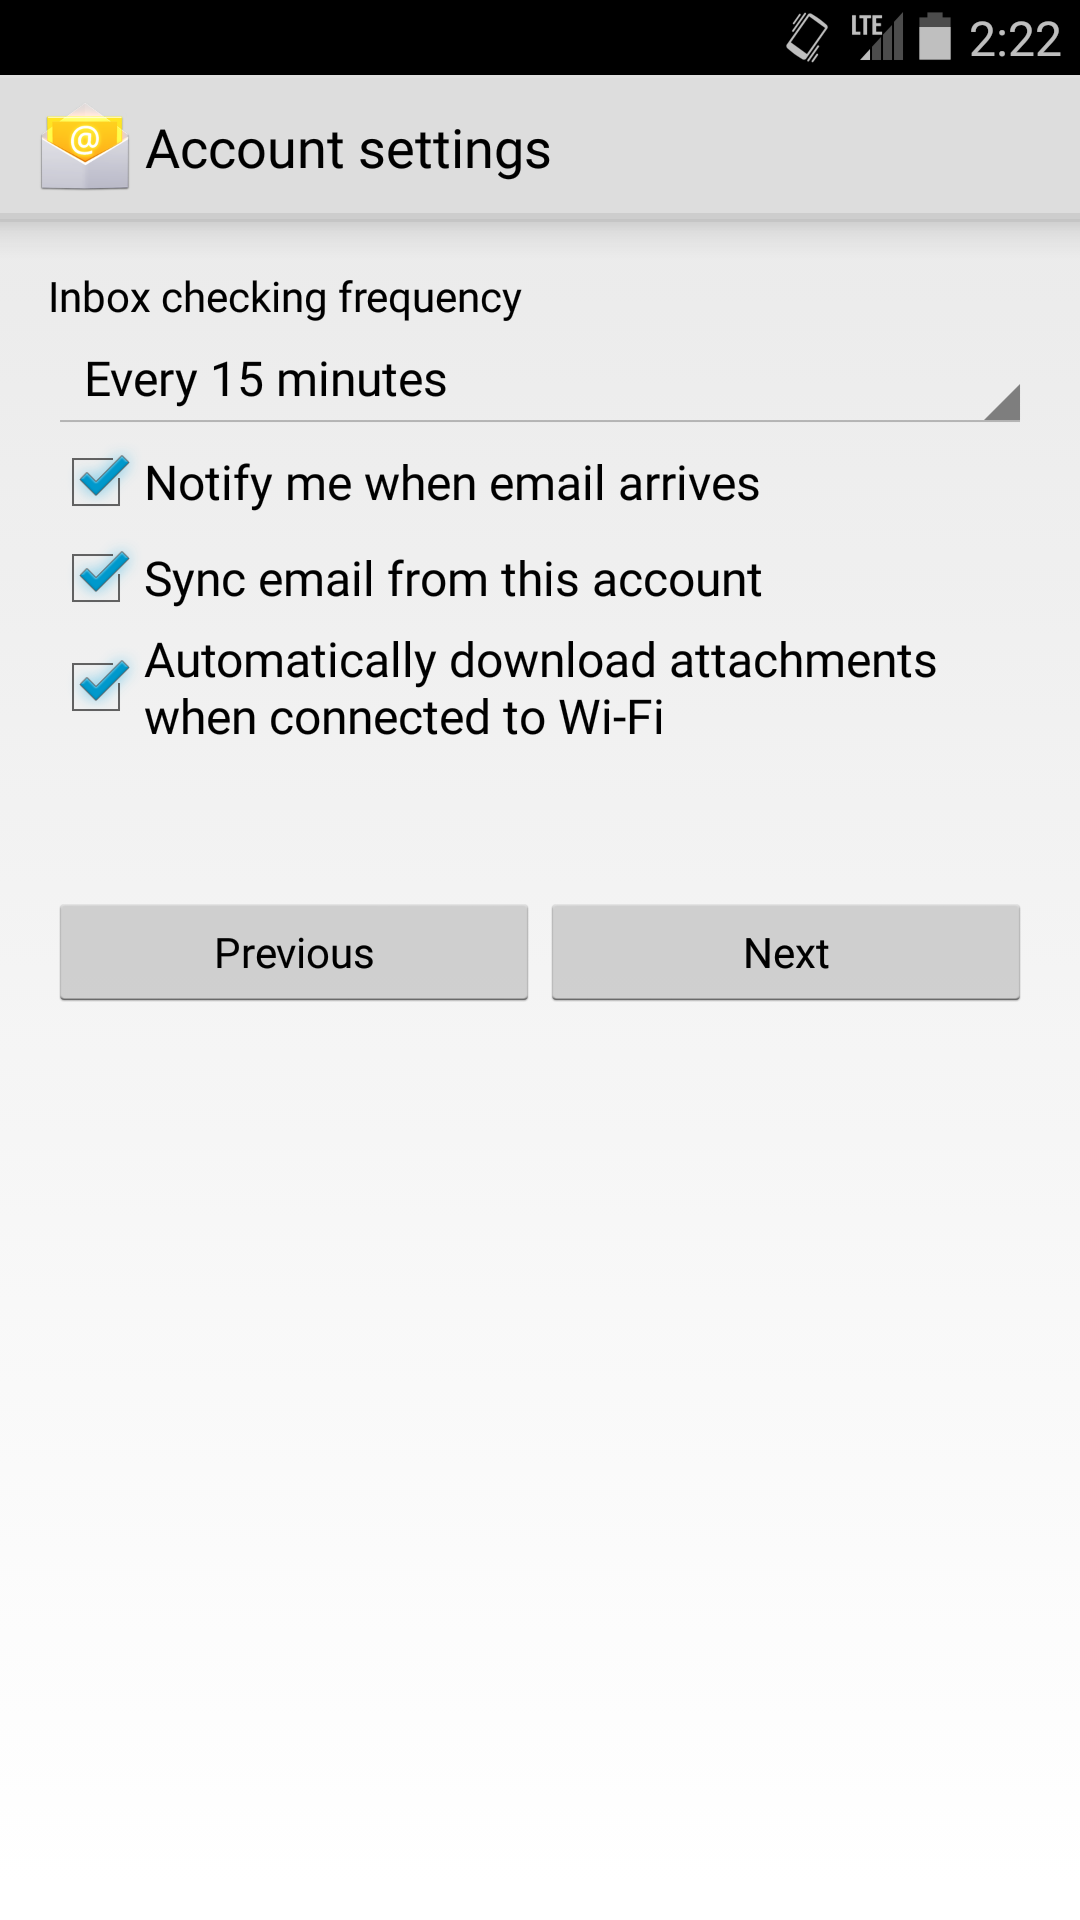
Change these settings as you like. Select Next when finished. Your account is now set up!
-
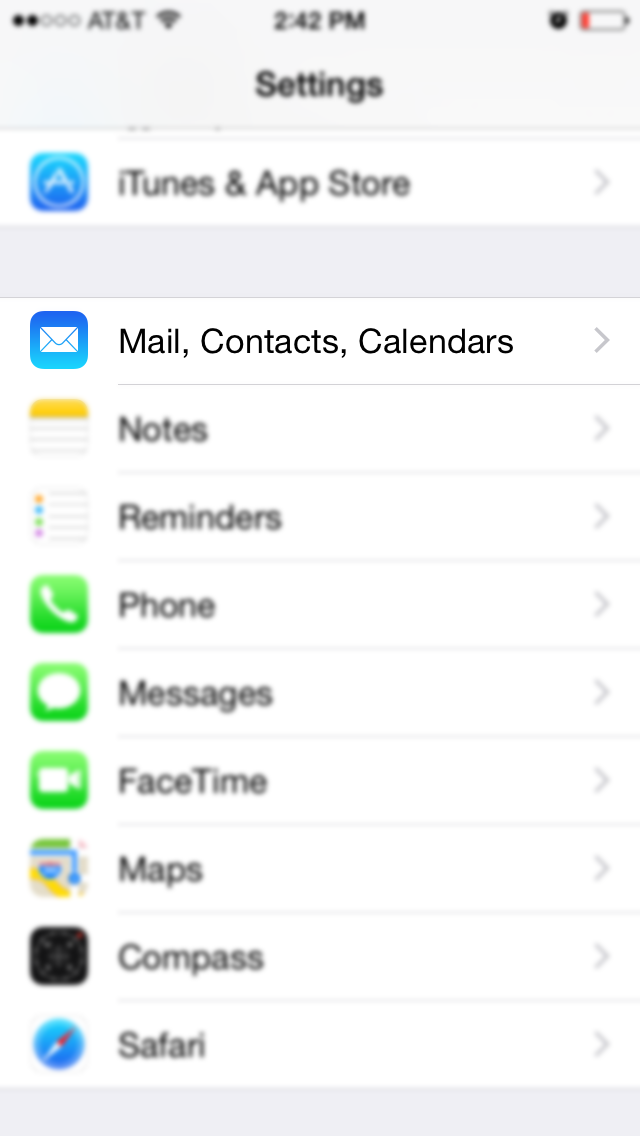
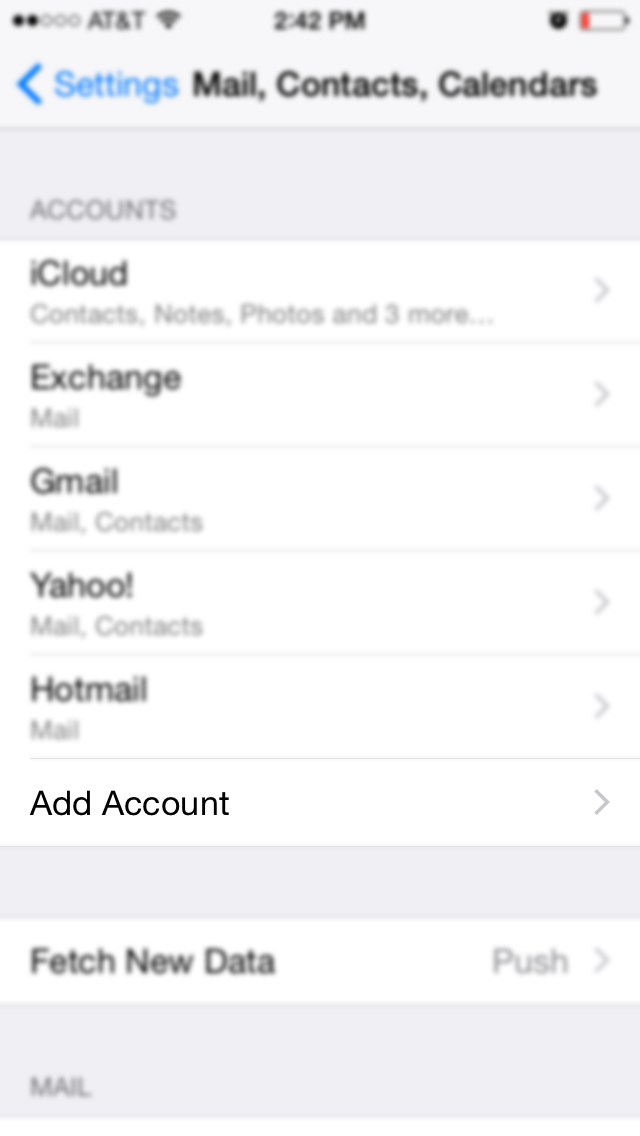
iOS / IPhone Setup
*Click the version to reveal instructions.
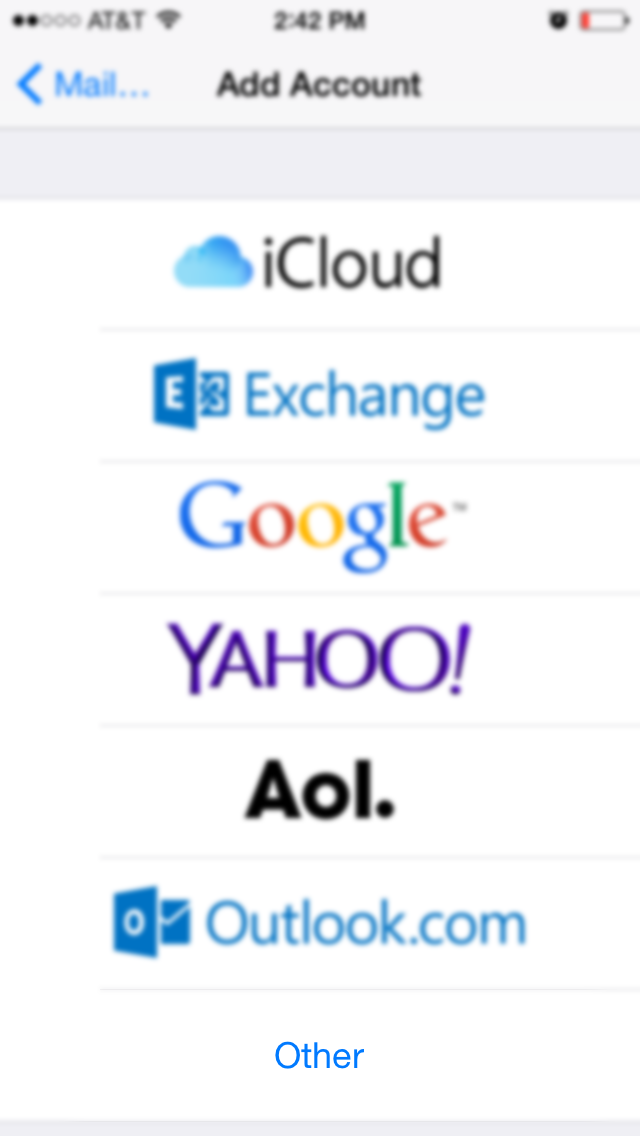
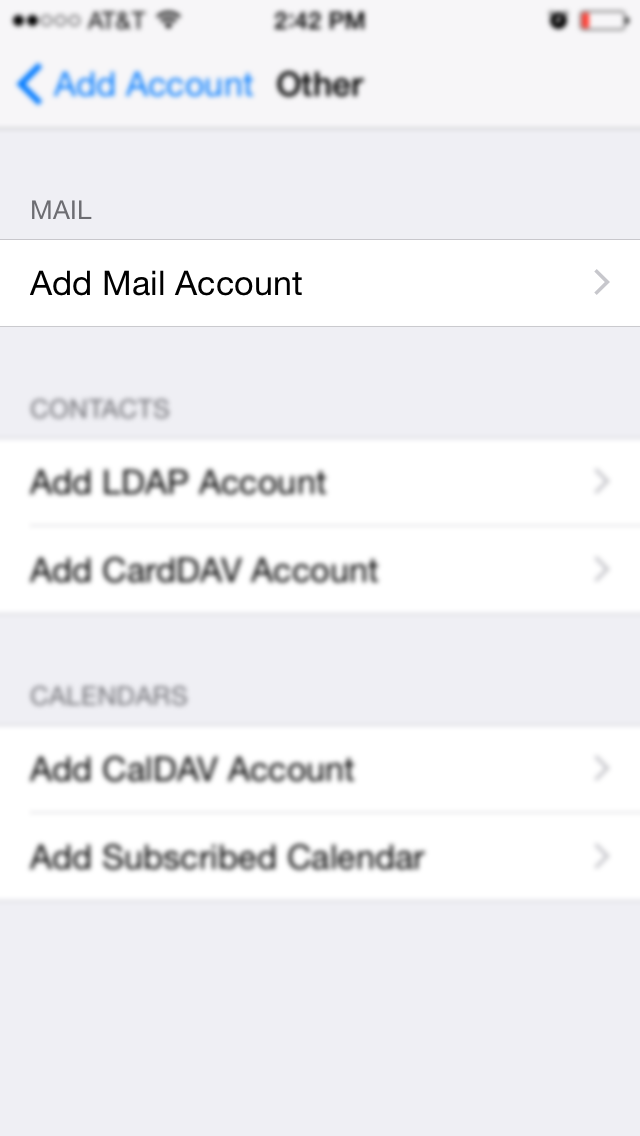
Choose Other → Add Mail Account.
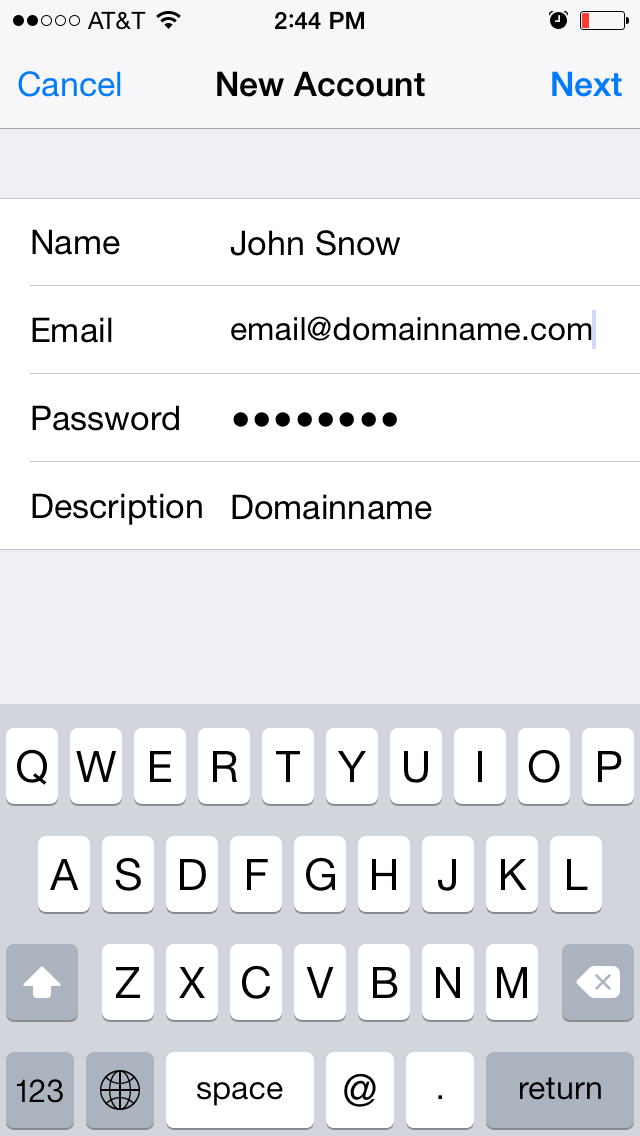
Fill out New Account details. 'Name' should be your full name, 'Email' should be your full email address, 'Password' is your email password (if you don't know it please email support@sharpinnovations.com and ask for them to retrieve your password), and 'Description' can be anything you want. The Description field just helps you identify which account it is if you have multiple on your device. Tap 'Next' in the top right.
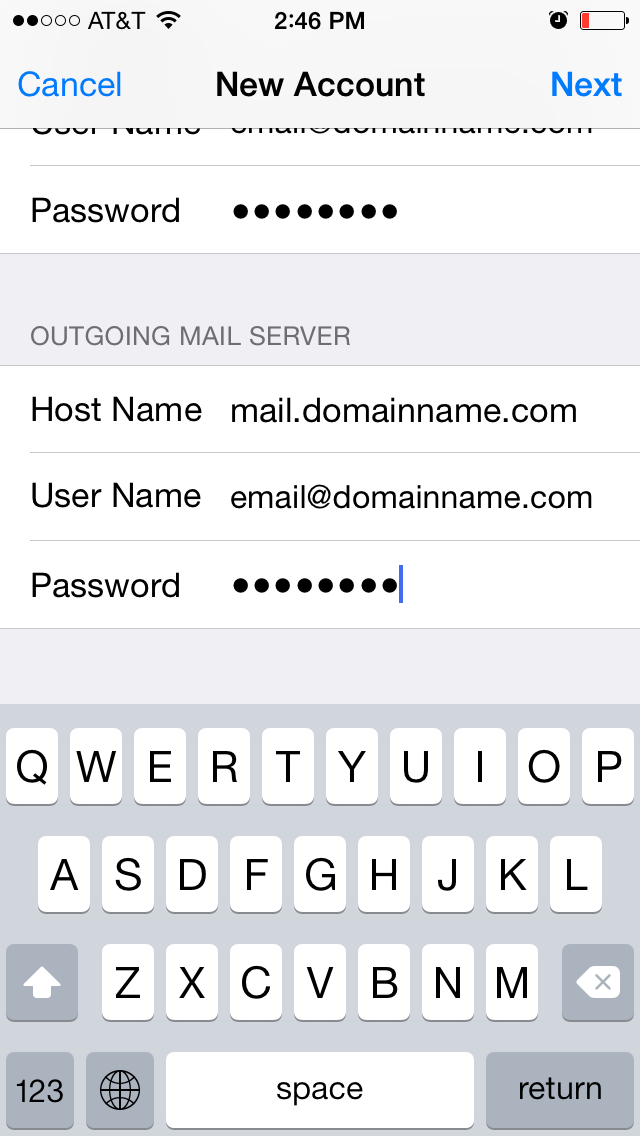
Scroll down on this screen and input the 'Host Name', which should be 'mail.YOURDOMAIN.com'. In other words, if your domain name is sharpinnovations.com, your 'Host Name' would be mail.sharpinnovations.com. The 'User Name' is your full email address, and the 'Password' is your email password.
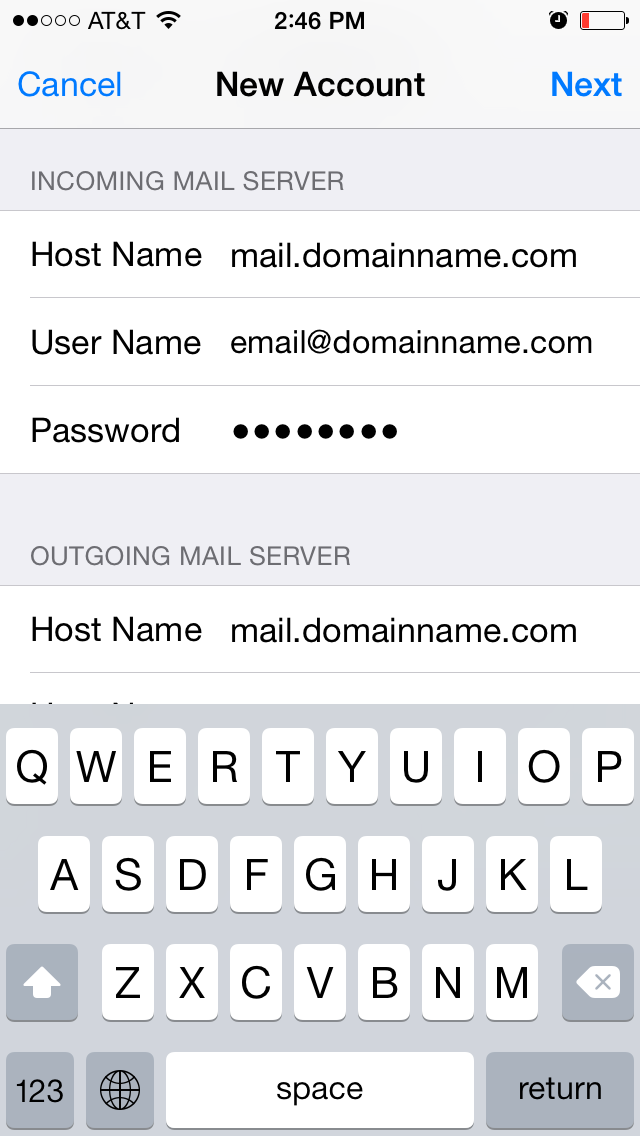
Fill out the same fields with the exact same info further down the screen for 'OUTGOING MAIL SERVER'. Tap 'Next' in the top right.
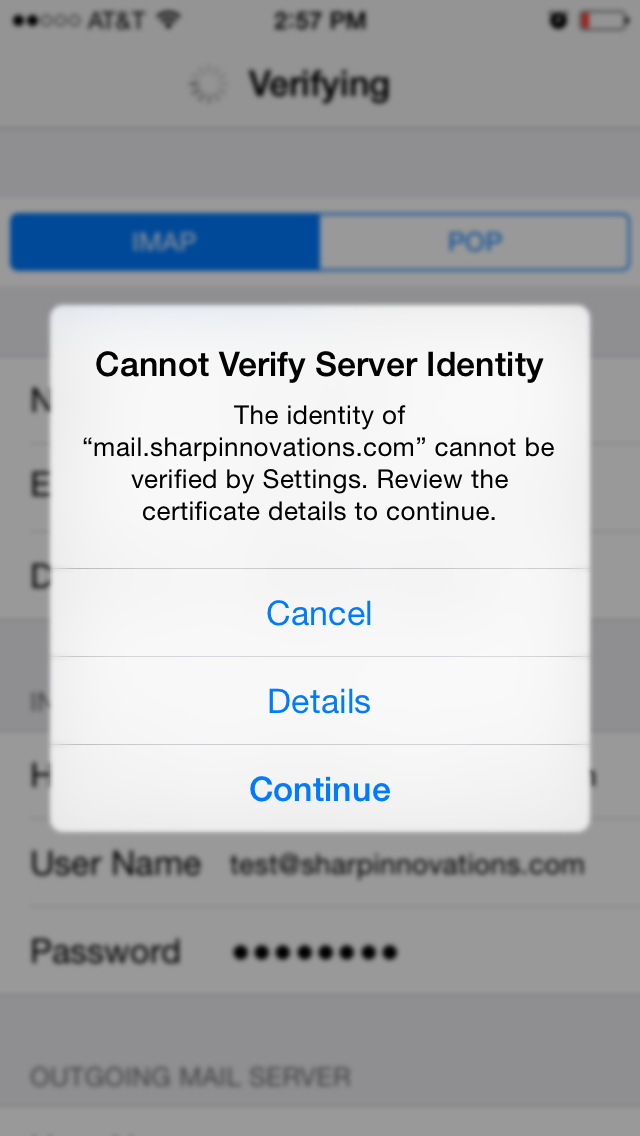
You will receive a message that reads 'Cannot Verify Server Identity' at this point. Simply tap 'Continue'. You may receive this message a second time shortly after, simply tap 'Continue' again.
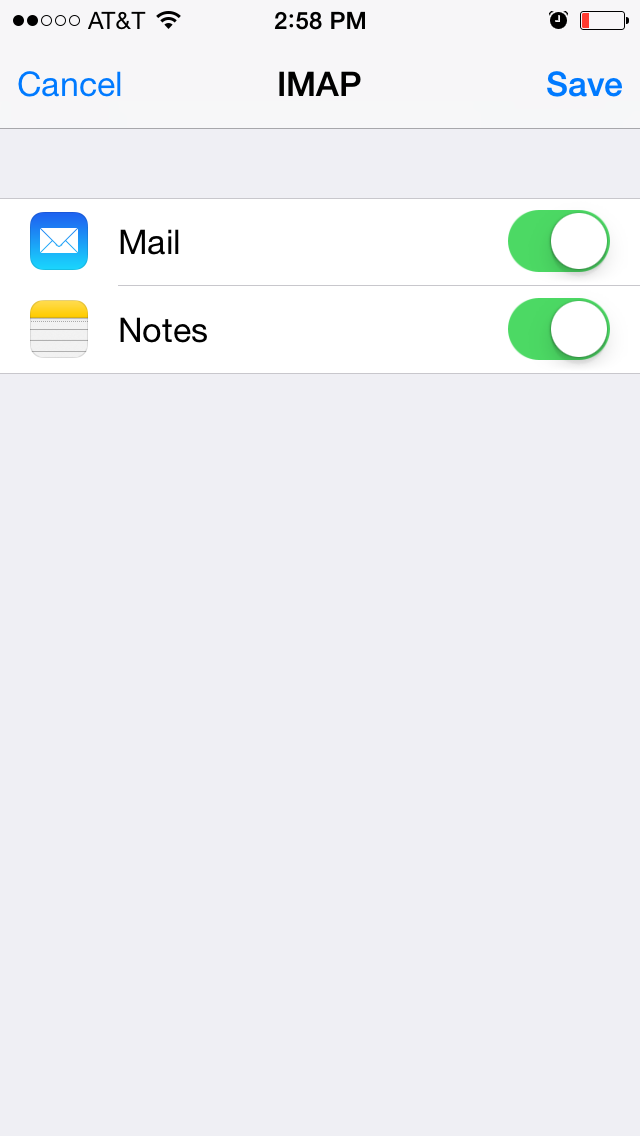
Tap 'Save' in the top right.
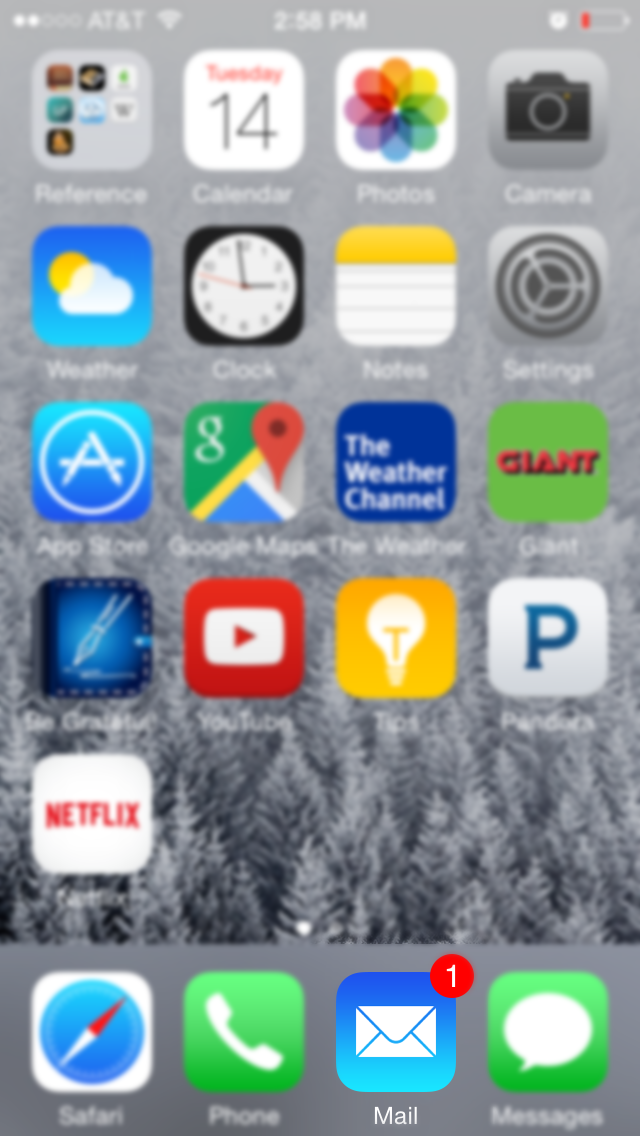
To make sure your account was set up correctly, press the home button on your iOS device to return to the main screen and launch the Mail app. Your messages should start coming in within a minute or so.
If you received an error message or are having problems adding your account, and you already checked your settings for typos, please contact support@sharpinnovations.com so we can help get you up and running!
-
GMail Setup
This was done using Outlook 2007. Your Outlook may appear differently or may require extra steps to perform.
*Click the version to reveal instructions.
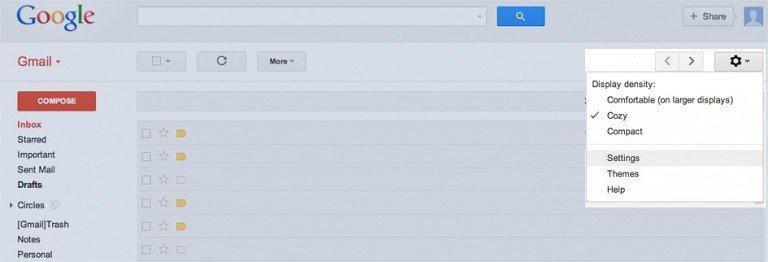
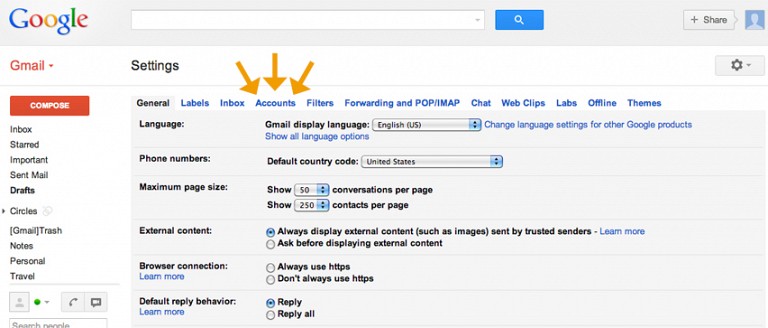
Click the gear icon in the upper right, then select Settings.
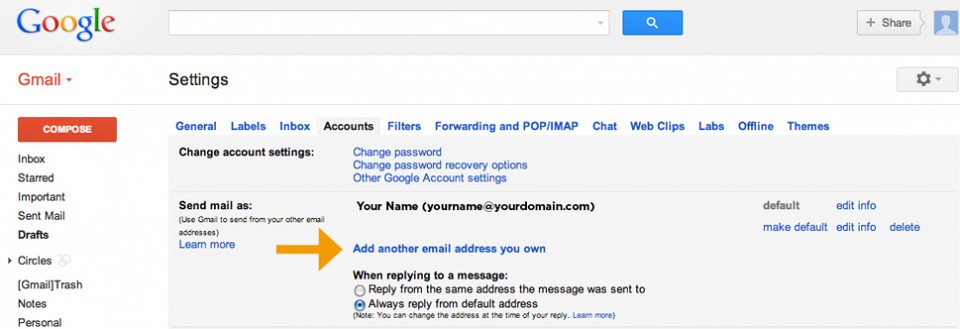
Select the Accounts and Import tab (or Accounts tab, if you're using Google Apps).
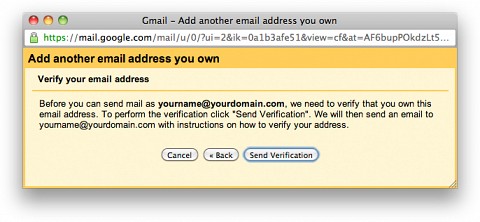
Under Send mail as, click Add another email address.
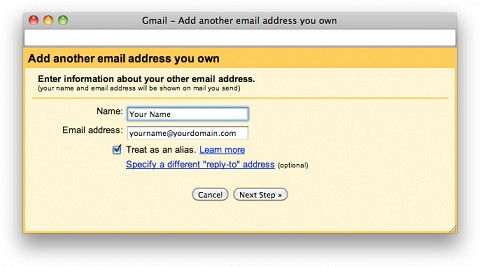
In the 'Email address' field, enter your name and alternate email address.
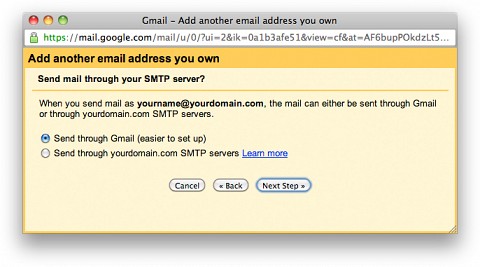
1. Use Gmail's servers to send your mail (this is easier to set up).
2. Use your other email provider's SMTP servers (we recommend this option for professional mail accounts or domains). Note for Google Apps users: Depending on your domain type, this feature may be disabled by default. Talk to your administrator if you have any questions.
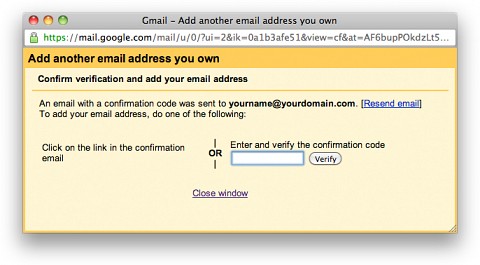
1. Click Next Step → and then click Send Verification. Gmail will send a verification message to your other email address to confirm that you own it.
2. Open your other account and either click the link in the message Gmail sent or enter the confirmation code in the Accounts section of your Gmail settings.
If Gmail sends a verification email and you didn't receive the it, the message was probably caught by a spam or bulk mail filter in your recovery email system. Try checking your Spam or Bulk Mail folders for a message from account-verification-noreply@google.com to see if the email ended up in there.
Your Gmail address will still be included in your email header's sender field, to help prevent your mail from being marked as spam. Most email clients don't display the sender field, though some versions of Microsoft Outlook may display "From yourusername@gmail.com on behalf of customaddress@mydomain.com." For this reason, if you don't want 'on behalf of' to appear in any of your messages, we recommend using the SMTP servers of your other email provider.
1. Enter the SMTP server (e.g. smtp.domain.com), your username on that domain, and your password for that account. You may also need to adjust your port setting or SSL setting (talk to your other ISP if you need this information).

2. Click Add account
3. Open your other account and either click the link in the message Gmail sent or enter the confirmation code in the Accounts section of your Gmail settings.
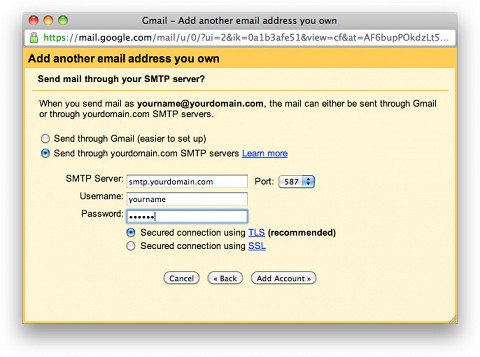
Your other email provider has to provide authenticated SMTP support for you to use this option. We'll use TLS by default, or SSL if you enable it. Many email services that provide POP or IMAP support also offer authenticated SMTP support, and you can likely find your SMTP server configuration instructions alongside information about POP or IMAP. Also, this new version of custom 'From:' doesn't work with Yahoo! Mail Plus accounts just yet, but we've reached out to Yahoo! to try to get it working.
To use one of your alternate sender addresses, click the From link when you compose a new message. If you're replying to or forwarding a message, click the field where your recipients are listed, then click From. After clicking From, you'll see a drop-down menu next to your address, where you can select the email address you'd like to send from.
If you ever need to edit the name, configuration or reply-to address, go back to your settings. Click edit next to the address on your Accounts tab. To delete an address, just click delete.
Note for IMAP/POP users: If you access Gmail through a POP or IMAP email client (e.g. Outlook) and would like to send messages with a custom "from" address, you have two options. We recommend that you configure your email client with two outgoing SMTP servers, one for Gmail and one for your other address. Or, you can use Gmail's outbound servers with a different "from" address. If you've already configured the alternate address, your message will be sent from:otheraddress@domain.com, sender:username@gmail.com, regardless of which custom from configuration you chose.
-
Exchange Setup
This was done using Outlook 2007. Your Outlook may appear differently or may require extra steps to perform.
*Click the version to reveal instructions.
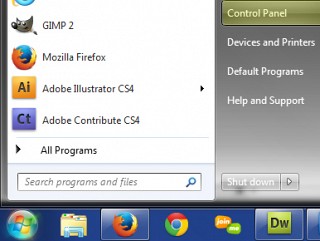
Start your Exchange setup by clicking the Start button → Control Panel.
Towards the upper right, in the search box that says "search control panel," type mail. Select the Mail button to open your Outlook settings.
On the Mail Setup - Outlook dialog box, click the button that says Show Profiles, then click Add. *Note* If you already have a profile, click the E-mail Accounts button, and click New.
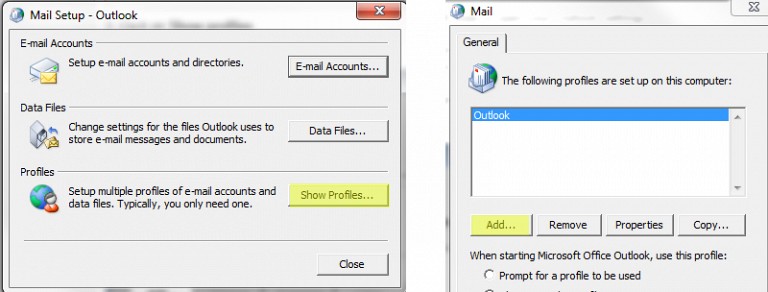
Enter a profile name in the Profile Name box and click OK.
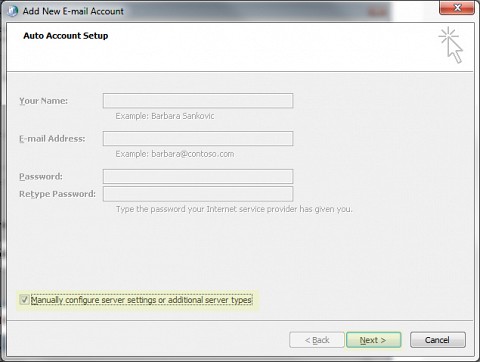
Click the checkbox next to Manually configure server settings or additional server types and then click the Next button.
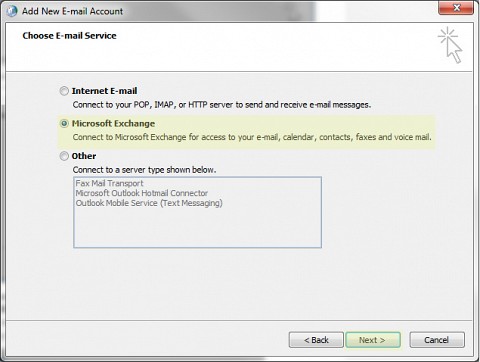
Click the button next to Microsoft Exchange to select this setup, then click Next.
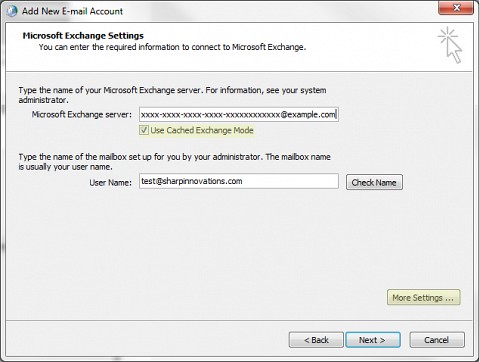
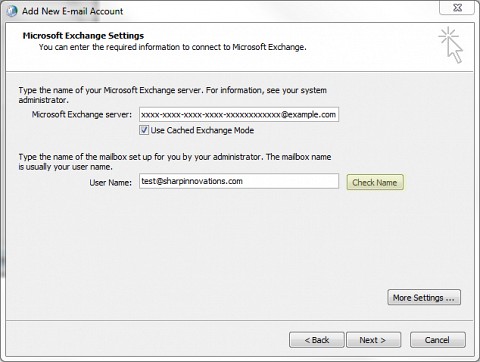
Enter the information provided by Sharp in the boxes as follows. In the Microsoft Exchange server box, enter your manual configuration alias we provided you with. An example will look something similar to xxxxxxxx-xxxx-xxxx-xxxx-xxxxxxxxxxxx@example.com. Make sure the button for Use Cached Exchange Mode is checked. In the User Name box, enter your email address. When your screen looks similar to below, click the More Settings... button.
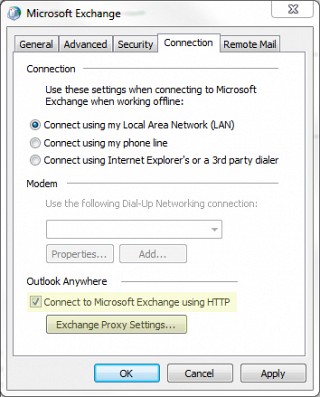
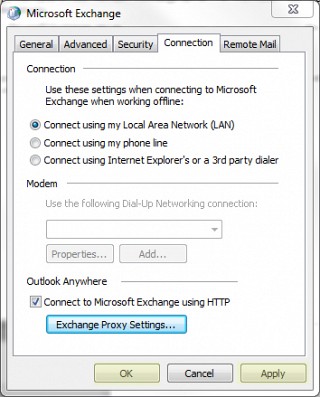
After clicking More Settings, click the tab labeled Connection on the top. Click the checkbox at the bottom labeled Connect to Microsoft Exchange using HTTP, then click Exchange Proxy Settings....
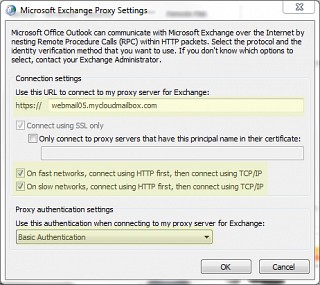
In the Microsoft Exchange Proxy Settings dialog box that is now open, enter the proxy server URL below the Use this URL to connect to my proxy server for Exchange box, that we provided for your Exchange account. Click the box next to On fast networks, connect using HTTP first, then connect using TCP/IP, and make sure On slow networks, connect using HTTP first, then connect using TCP/IP is checked as well. Under Use this authentication when connecting to my proxy server for Exchange, change the selection to Basic Authentication. Before continuing, be sure your screen looks similar to below.
Click the OK button, then click Apply and OK once again.
Make sure you email address is still in the User Name field, and then click on Check Name.
Enter your email address and password in the appropriate fields, and click the Remember my password box to save your information.

Click the OK button.
When Outlook is finished loading, your username and server should now both be underlined. Click Next and then click Finish. Close the Mail screen that is still open, and restart Outlook. If you are asked for a password, enter your account password. If you see a notification in the lower right that says Microsoft Outlook is setting up a local copy of your mailbox... you can be sure your account has been successfully setup. Let this load and you can then begin using your Exchange account.
Feel free to contact us if you run into any issues or have any questions.
-
Webmail
Our Webmail service provides a basic way to access your email from any computer by logging into your account through a web browser. This method requires no setup, just a login. This is convenient if you need temproary access to your email on a different computer than usual and don't want to configure a program like Outlook or Thunderbird to use it. For your main computer, we highly recommend using a program like Outlook or Thunderbird instead of Webmail.
To access webmail, simply go to webmail.YOUR-DOMAIN.com, replacing YOUR-DOMAIN with your website address. For example, if your domain name is sharpinnovations.com, to access webmail you would go to webmail.sharpinnovations.com. This will bring up a login screen. Your full email address goes in the username field and your email password goes in the password field.
If you receive a message about maintenance, just click the 'Skip Maintenance' button to proceed to your inbox.
Feel free to contact us if you run into any issues or have any questions.