How to Copy a WordPress Site from One Domain to Another6 min read
July 26, 2021A common need among WordPress sites is changing the site URL or domain name while maintaining the website itself. Whether you’re rebranding or want to make a staging (beta) version of your website to test changes, this is a helpful tool to have.
Several things that need to happen to successfully move a WordPress site to another domain name, and various ways to accomplish them. There are a variety of free plugins available that take care of nearly all the heavy lifting, however, most of them have some form of limitation. These instructions will examine the plugin approach but will touch on a manual method as well, which assumes some level of technical acuity.
Want some help? Schedule a free consultation and let’s see how we can partner on your website project.
Step 1: Create a Backup
Before starting to make any changes that could render your site inaccessible, it is important to create a backup. If you’re comfortable with the technical details, you’ll want to log in to your hosting panel and obtain a copy of your database to download all of your site files off of the server. That way, if anything goes awry, you’ll have what you need to get back to working order.
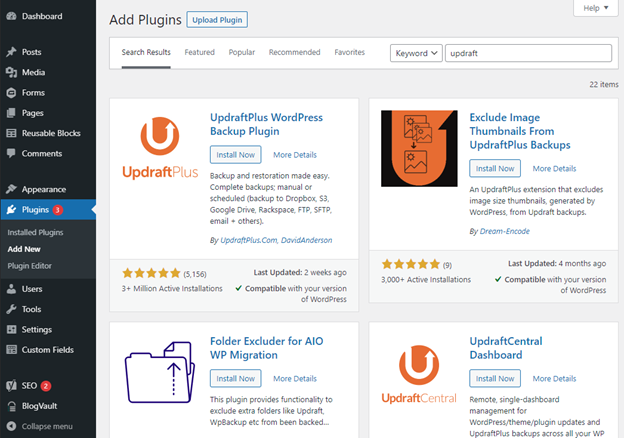
If you’re not sure how to create a backup, you can download and install the UpdraftPlus WordPress Backup Plugin by logging into WordPress, hovering over Plugins, clicking Add New, then searching for Updraft. Click Install Now, wait for the installation to complete and then click the Activate button that appears.
It will take you through a tutorial from there. Make sure to download a copy of the backup it creates so you can upload it back to the server if necessary.
Step 2: Prepare for Changes
With a backup in place, changes can be made safely with the ability to revert the site back to its current state if anything goes wrong. Before moving forward, check to make sure you have a few critical things already set up:
- Make sure you own the domain name you are moving the site to.
- Make sure the DNS is configured for that domain so that it’s pointing to the IP of your web server.
- You’ll need login information to your hosting panel (Plesk, cPanel, etc. …) or contact information for whoever manages that.
Once the next step is taken the site will become inaccessible on its current domain until you enter the hosting panel and update the domain name on the server level. It is critical that the above is done prior to continuing.
Step 3: Update URL’s
You will need to modify every instance of the old site URL or address everywhere it exists in the database. The database stores all the content on every page through the WordPress editor, plugin settings, and more. If there are instances of the old site address anywhere else (hardcoded in files), those will need to be changed manually. If someone manages your website, be sure to work with them on this process.
We’ve helped many businesses successfully migrate their WordPress site from one domain to another. Give us a call if you need assistance.
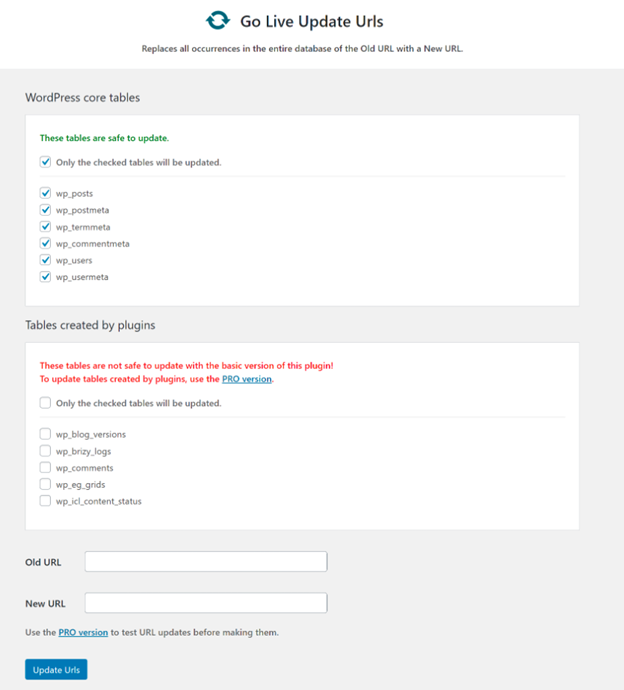
In this step, you’re going to install another plugin, so repeat Step 1 but choose the Go Live Update Urls plugin. Once activated, head to Tools à Go Live to get to the plugin page. All you need to do is enter your old website address in the “Old URL” field, and the new one in the “New URL” field below it. Once you click the “Update Urls” button, the site will become inaccessible at the old address.
If you’re more technically inclined, you can download a copy of the database via phpMyAdmin or whatever your hosting panel uses for database management. Use a tool like Sublime Text to Find and Replace all instances of the old address and replace them with the new one. Then upload this new copy of the database to the server.
Step 4: Update Hosting Panel Address
For your website to be visible at the new address, you need to adjust the domain name configured at your web host. How to do this changes depending upon the hosting environment, but they are generally similar. Login to your hosting panel and, under your Hosting Settings, there should be the ability to change the domain name associated with your hosting package. If you’re unable to find it, there should be some documentation available with your host. Contact their customer service, or whoever manages your website. Once you find it, update the domain to what you entered in the “New URL” field of the Go Live plugin page. Assuming everything outlined in Step 2 was done properly, you should see your site appear right away at your new URL once that change saves.
If you intend to keep your old site address as a forwarding address, you will likely need to add that as a Domain Alias in your hosting panel set to Redirect. We recommend you do this. Any links on the site pointing to the old URL will still work with this redirect in place.
Step 5: Test!
Any time you’re making a significant change like this to a website, testing is vital. If you have any forms that users can submit, make sure those still work and are sending their emails properly. Review every page and all links to make sure none were missed. Any other dynamic functionality – anything beyond static content displayed on the page – should be run through to ensure nothing broke during the migration process. If everything went properly, you shouldn’t notice any problems at all!
Obviously, there are a lot of additional details that could be explored and case-by-case scenarios that could be specific to your website, so we highly encourage working closely with whoever manages your website when performing this process.
Sharp Innovations provides all of the access required to make these changes to the sites we host, though traditionally this is something the staff takes care of on clients’ behalf. If you are looking to move your hosting elsewhere or potentially re-brand as part of your domain change, Sharp Innovations would love to help! Start a conversation with us today.

Greg started his career with Sharp Innovations in the Client Support Specialist role, evolving over the years into Account Management, Design, Project Management, Sales, and other duties, eventually becoming a partner in 2023. He is currently VP of Account Management & Sales, focusing his energy on ensuring our top 20 clients are served with excellence. His dedication towards exceptional customer service and care for the clients he works with has been recognized time and time again. Greg appreciates the diverse nature of his role and continues to explore new ways he can serve Sharp Innovations and our clients.